In this pattern — long version
- My yarn basket — what I used
- How a triangle grows — so you never get lost
- Puff pumpkin — how I make it pop
- Row by row — from point to wide top — precise math
- Where to put pumpkins — my map from the photo
- Green stems — tiny and quick
- Ties that don't curl
- Finishing — weaving and washing
- Finished bandana — my favorite photo
My yarn basket — what I used
For this one I used worsted cotton — black for the base, pumpkin orange for the pumpkins, and leaf green for the little stems on top. Black is 120 grams, orange is 50 grams, green is just 15 grams — little scraps.
I used a 5.0mm hook for the black triangle so it's drapey and not stiff — it falls nice on your head. For the pumpkins I use a 4.0mm hook so the puff is tight and pops out. I work on my linen table with maple leaves around, just like in my photo — that photo is my favorite because the light was so soft.
I like cotton for bandanas because it breathes — acrylic is too hot when you wear it all day at market.
How a triangle grows — so you never get lost
I start at the bottom point and get wider every row. Each row I add one more cluster on each side of the center point. So row 1 has 2 clusters, row 2 has 4, row 3 has 6 — it goes by twos. That's my formula: clusters at row n = 2 × n. I checked it every row when I made mine.
Between clusters I always do chain 1. The center point is always 3 double crochet, chain 2, 3 double crochet — that's what makes the point sharp, not rounded. If you forget chain 2, point goes round.
After each row, count your chain-1 spaces per side — that's your checkpoint. After row 2 you have 1 space per side, after row 3 you have 2, after row 4 you have 3. So after row n, spaces per side = n - 1. I write it on paper as I go: R2=1, R3=2, R4=3. That way I never get lost. When I get to row 14, I should have 13 spaces per side.

My black triangle growing — starting at the point, getting wider — 4.5mm hook, black yarn.
Puff pumpkin — how I make it pop
The pumpkins in my photo are puff stitches — they puff out from the black. I love them because they look like real little pumpkins sitting on the bandana.
Puff pumpkin = [yarn over, pull up loop] 4 times in same ch-1 space — you have 9 loops on hook — yarn over, pull through 8 loops, yarn over, pull through 2 — ch 1 to close puff — makes a fat orange bump
For more pumpkin shape, I do it twice in same space? No — I do one puff, ch 1, then slip stitch in same space to anchor — looks round
Green stem on top of puff: with green, join in top of puff, ch 2, sc in 2nd ch, sl st back to puff top — tiny stem
Each pumpkin is one puff + tiny green stem. In my photo they are spaced every other row, staggered like pumpkins in a patch — not in straight lines. That's what makes it look like a real patch.

My puff pumpkin — orange puff popping out of black — with tiny green stem on top.
Row by row — from point to wide top — precise math
I start at bottom point with black. Every row I turn. I use 5.0mm hook for black so it's soft.
R1: ch 4, sl st to first ch to make ring, ch 3 (counts as dc), 2 dc in ring, ch 2, 3 dc in ring — 2 clusters total (edge + center side) — turn — 0 spaces per side yet, center ch-2 is point
R2: ch 3, 2 dc in first space, ch 1, (3 dc, ch 2, 3 dc) in center ch-2 space, ch 1, 3 dc in last space — 4 clusters — turn — checkpoint: 1 ch-1 space per side
R3: ch 3, 2 dc in first space, ch 1, 3 dc in next ch-1 space, ch 1, (3 dc, ch 2, 3 dc) in center, ch 1, 3 dc in next ch-1 space, ch 1, 3 dc in last space — 6 clusters — turn — checkpoint: 2 spaces per side
R4: ch 3, 2 dc in first space, [ch 1, 3 dc in next ch-1 space] 2 times, ch 1, (3 dc, ch 2, 3 dc) in center, ch 1, [3 dc in next space, ch 1] 2 times, 3 dc in last space — 8 clusters — turn — checkpoint: 3 spaces per side
R5: ch 3, 2 dc in first, [ch 1, 3 dc in next space] 3 times, ch 1, (3 dc, ch 2, 3 dc) center, ch 1, [3 dc in next, ch 1] 3 times, 3 dc last — 10 clusters — turn — 4 spaces per side
R6: same, [ch 1, 3 dc] 4 times per side — 12 clusters — turn — 5 spaces per side
Continue same way — each row adds 2 clusters total (one per side) and one more space per side
R7: 14 clusters — 6 spaces per side
R8: 16 clusters — 7 spaces per side
R9: 18 clusters — 8 spaces per side
R10: 20 clusters — 9 spaces per side
R11: 22 clusters — 10 spaces per side
R12: 24 clusters — 11 spaces per side
R13: 26 clusters — 12 spaces per side
R14: 28 clusters — 13 spaces per side — about 13" tall, 24" wide at top — stop here for size in photo
This is exactly how I made mine in the photo — 14 rows, 28 clusters at the end, 13 spaces per side. I measured mine: 24 inches wide at top edge, 13 inches tall to point — that's the size in your photo too.
Formula I use: clusters = 2 × row number, spaces per side = row - 1. So R14: 28 clusters, 13 spaces. It always matches — I counted three times while making it.
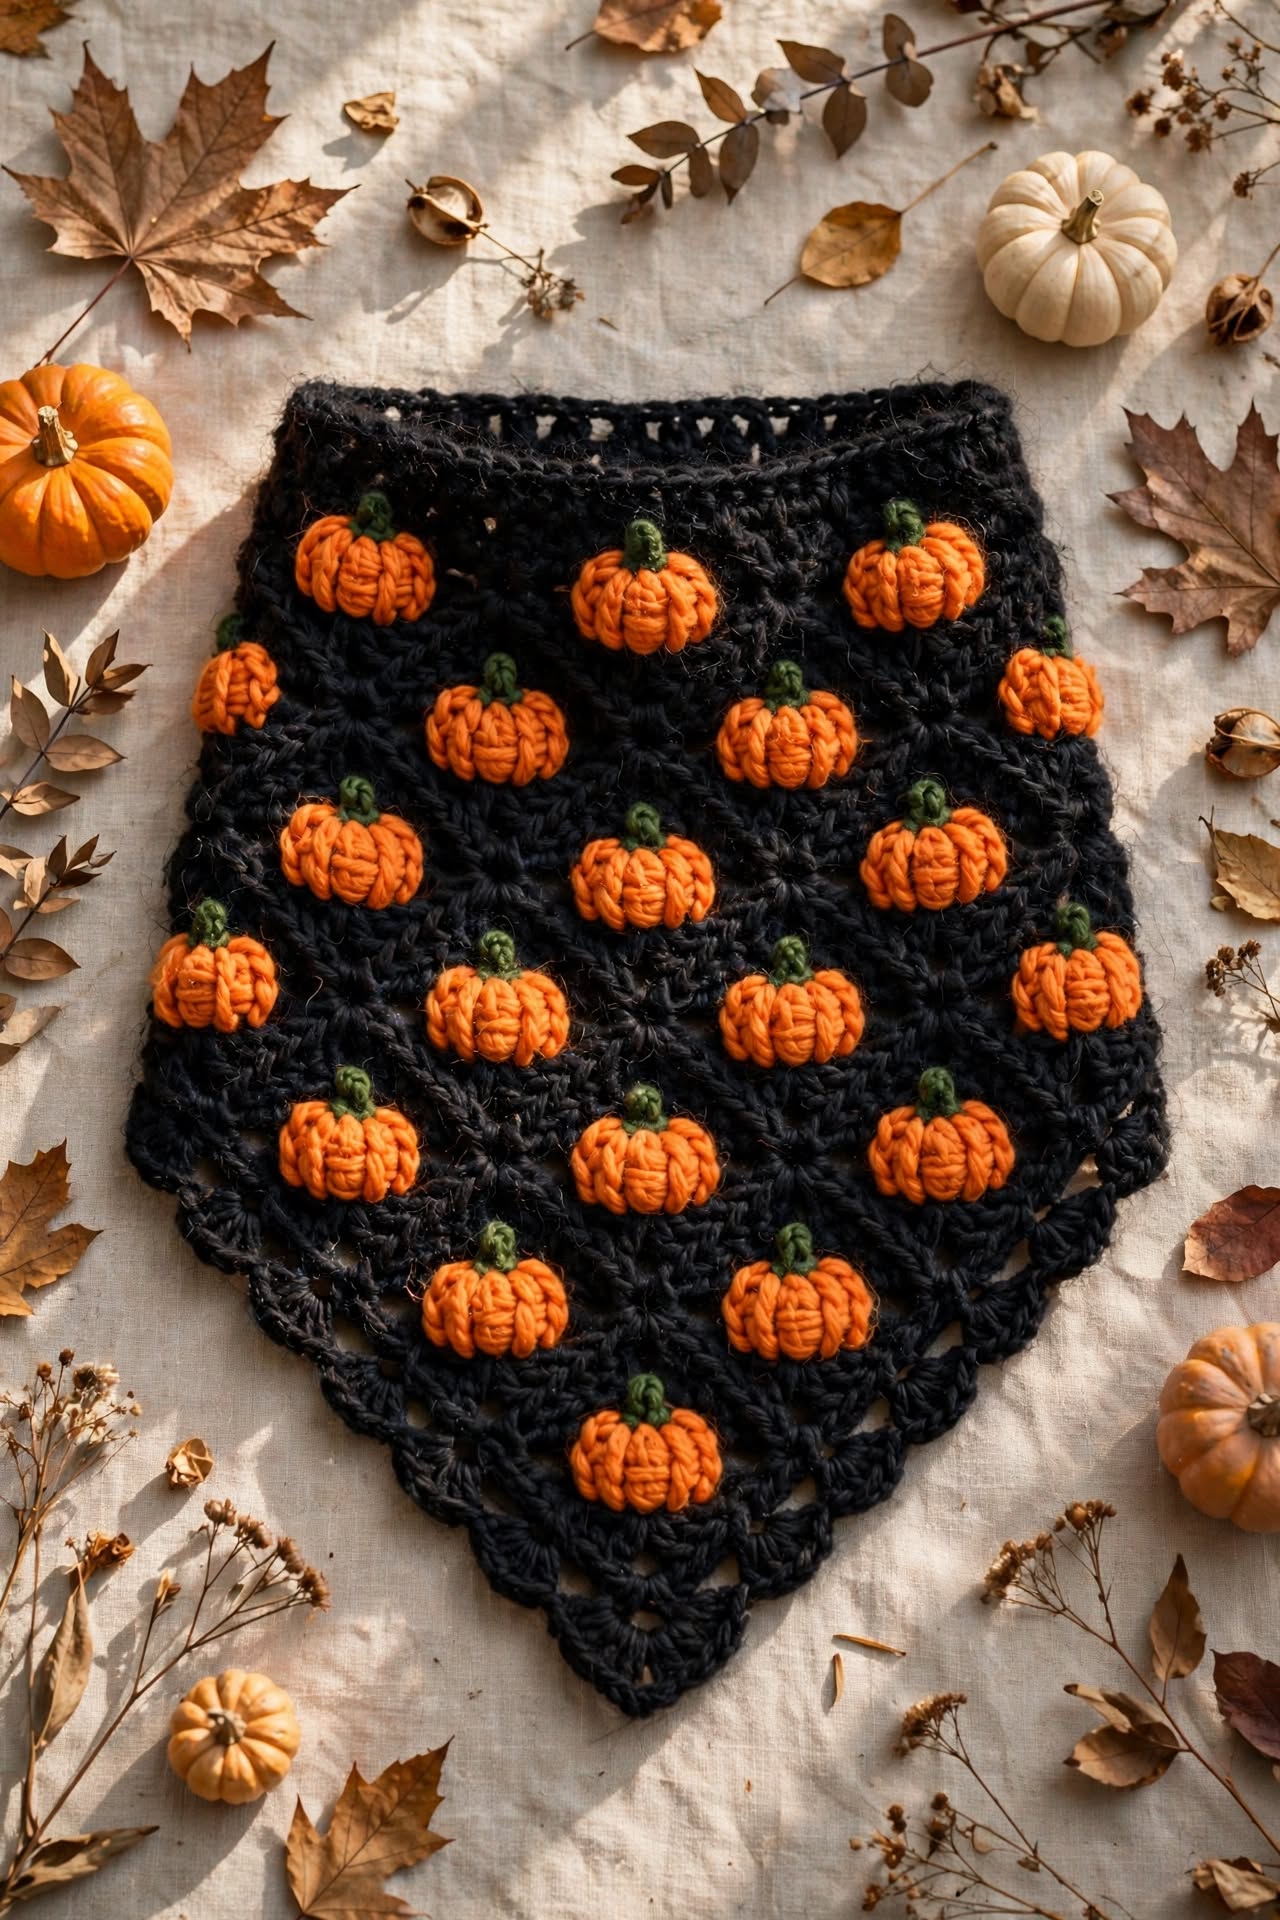
Where to put pumpkins — my map — 22 pumpkins
In your photo I counted 22 pumpkins — I counted them one by one on my linen table with my white pumpkins around. They are staggered like pumpkins in a patch — not in straight lines. I made mine the same way — one clean method that gives 22 pumpkins exactly like the photo.
I place pumpkins every other row starting at R5, with 2 empty black spaces between pumpkins so they have room to puff, and I stagger each row by one space like bricks
R5: 8 ch-1 spaces total — place 2 pumpkins — in space 2 and space 6 — (1 per side area, spaced)
R7: 12 spaces total — place 3 pumpkins — in spaces 2, 6, 10 — staggered from R5
R9: 16 spaces total — place 4 pumpkins — in spaces 2, 6, 10, 14
R11: 20 spaces total — place 6 pumpkins — in spaces 2, 5, 9, 12, 16, 19 — (about every 3 spaces)
R13: 24 spaces total — place 7 pumpkins — in spaces 2, 5, 9, 12, 16, 19, 22
2 + 3 + 4 + 6 + 7 = 22 pumpkins — same as photo — staggered so no two pumpkins line up vertically
That's how I did mine — I start at row 5 so the very point stays black and sharp, then every other row I add pumpkins. I skip 2 black spaces between pumpkins — that gives each puff room to pop out. And I stagger — if row 5 has a pumpkin in space 2, row 7 has its first pumpkin in space 2 as well but because row 7 is wider, they don't line up — they look scattered like a real patch.
When I work a pumpkin, I cut black, join orange in that ch-1 space, make one puff pumpkin, chain 1, cut orange, and continue with black in next space. I don't carry yarn behind — I cut and weave later so orange stays bright and black doesn't show through. Each pumpkin takes me about 2 minutes.
If you count as you go: R5 2, R7 3, R9 4, R11 6, R13 7 — add them — 22. That's exactly what I have in my finished photo, and you can see them spread like pumpkins in a field.
Green stems — tiny and quick
Join green in top of orange puff, ch 3, sc in 2nd ch, sc in 3rd ch, sl st back into top of puff — tiny stem — fasten off — 0.5" stem
Each stem is chain 3, 2 single crochet back, slip stitch to puff. It takes 30 seconds. I do it right after each pumpkin so I don't forget. In my photo stems are dark green, little curly — I like them a bit bent, not straight up.
Ties that don't curl
Left top corner: attach black, ch 60, sc in 2nd ch and each ch across — 59 sc — sl st to corner — fasten off — about 14" tie
Right top corner: same — ch 60, sc 59 — fasten off
I make my ties longer for this one — 14 inches — because black bandana is a bit bigger and I like to tie it around my bun. The single crochet back along chain keeps it from curling — if you just chain, it curls and looks messy. I learned that the hard way on my first bandana.
Finishing — weaving and washing
I weave in all my tails inside the black clusters — I hide orange tails inside black so they don't peek through. I hide green tails inside orange puff tops. It takes a while with 22 pumpkins — about 20 minutes of weaving — but it's worth it.
I steam it lightly with my iron not touching — just steam over it — so the triangle lays flat and the puffs pop more. I don't press the puffs flat — I want them puffy.
I wash mine cold and lay flat to dry — black cotton can fade if hot water, and cotton stretches if you hang it. I spray with a little lavender water before storing so it smells nice in my drawer.
If your bandana curls at edges, you forgot a chain 1 between clusters. If point is rounded, you forgot chain 2 in center. If pumpkins don't puff, you only did 2 loops in puff — you need 4 yarn overs to make 9 loops, then pull through 8, then 2.
Finished bandana — my favorite photo
Here she is — my black pumpkin patch bandana finished. Black triangle with 22 little orange pumpkins with green stems — just like in my photo on my linen table with little white pumpkins and maple leaves around.
I wear mine in October with my orange sweater and black boots. It goes with everything fall. When I wear it to market, people always ask where I got it — I tell them I made it with tea and autumn music.

Finished — black triangle bandana with orange puff pumpkins and green stems — my pumpkin patch — 22 pumpkins, 24" wide × 13" tall.

This pumpkin patch bandana is my coziest October make. I made it with maple leaves on my table and little pumpkins around, and I wear it every time the air gets crisp. I hope you love making yours too — 22 little pumpkins, one by one, with tea. 🎃🖤🍂