Inside this pattern
- Why 3 squares and not a triangle from scratch
- What you need
- How big each square is
- Roadmap — squares, join, border, ties
- Step 1: Granny squares — make 3 in cream
- Step 2: Join into triangle — no sewing holes
- Step 3: Sage border — green like your photo
- Step 4: Ties — simple chains that don't curl
- How I wear mine
- If it curls or gaps
- Make it yours
Why 3 squares and not a triangle from scratch
I tried making a triangle bandana by increasing each row — it always came out wavy or the edges were uneven. Then I saw a photo like yours — 3 granny squares forming a triangle — and it clicked. Squares are easy to keep square, and when you join 3 in an L shape, the empty space in middle makes a perfect triangle point.
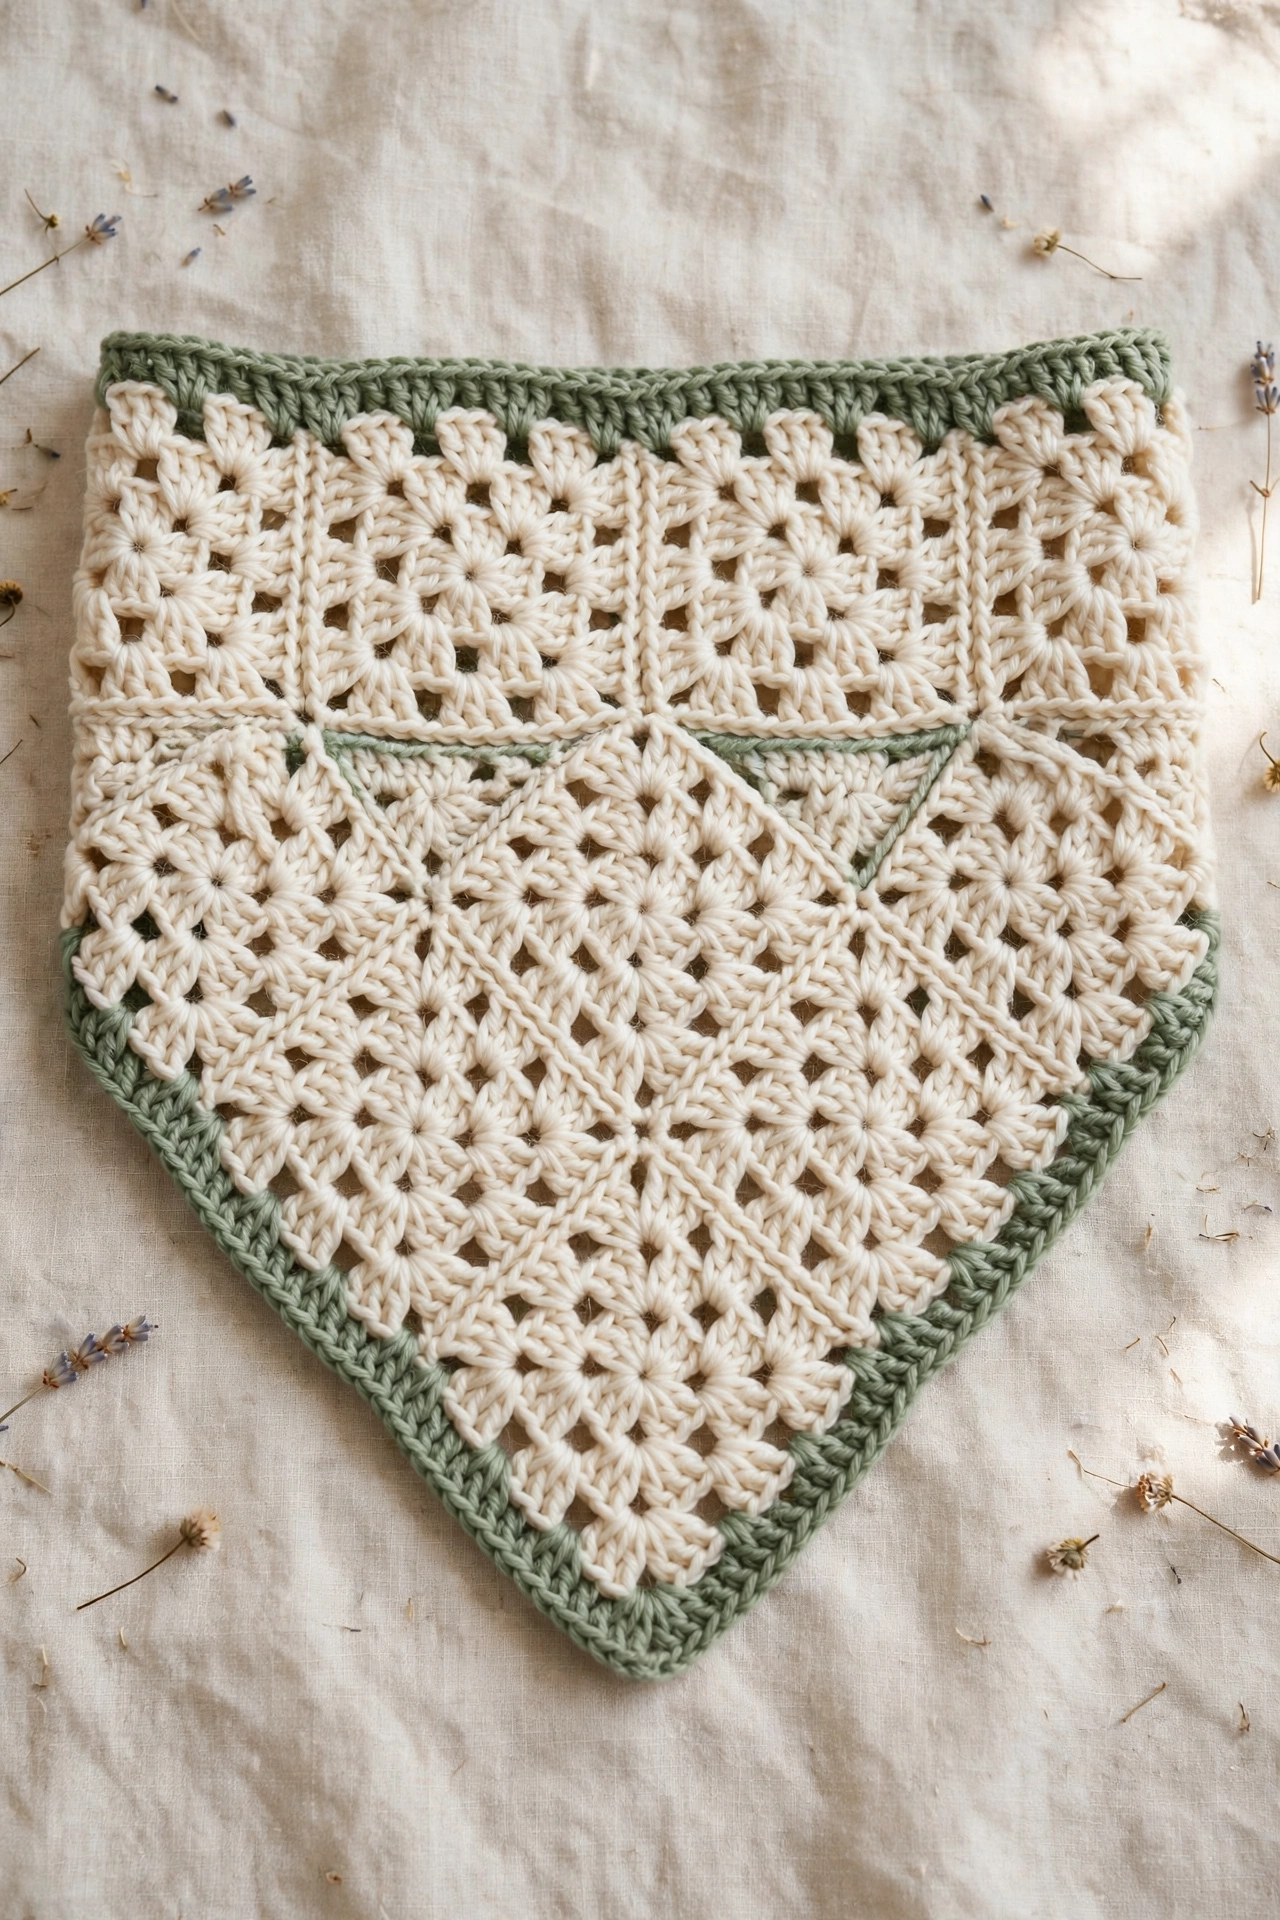
Your photo is exactly that: 3 cream granny squares, each about 4 rounds, joined with single crochet, then sage border around whole triangle. The center join where 3 squares meet is reinforced with a little green triangle — that's in your photo too — I do it with green yarn over the join.
Takes about 2 hours, and you can watch TV while making squares.
What you need
- Yarn: Worsted cotton — Cream / off-white 80g (like your photo — warm white, not bright), Sage green 30g (muted green, not bright)
- Hook: 4.5mm — I use 4.5mm so it's drapey not stiff
- Extras: Tapestry needle, scissors, stitch markers

My granny square — cream, 4 rounds, 3dc clusters with ch1 between. This is the only stitch you need.
How big each square is
Each square is 4 rounds — about 5" across. 3 squares joined make triangle about 20" wide along top, 11" tall to point. If you want bigger bandana, make 5 rounds per square — adds 2" overall.
Step 1: Granny squares — make 3 in cream
R1: mr, ch 3 (counts as dc), 2 dc in mr, ch 2, [3 dc in mr, ch 2] x3 — 4 clusters of 3 dc, 4 ch2 corners — sl st to top of ch3
R2: sl st to ch2 corner, ch3, 2 dc in same corner, ch2, 3 dc in same corner — corner made, ch1, [3 dc, ch2, 3 dc in next corner, ch1] x3 — sl st
R3: sl st to corner, ch3, 2 dc, ch2, 3 dc in corner, ch1, 3 dc in next ch1 space, ch1, [3 dc, ch2, 3 dc in corner, ch1, 3 dc in space, ch1] x3 — sl st
R4: sl st to corner, ch3, 2 dc, ch2, 3 dc in corner, ch1, [3 dc in space, ch1] x2, [3 dc, ch2, 3 dc in corner, ch1, [3 dc in space, ch1] x2] x3 — sl st — FO
Square should be 5" across, 3 clusters per side plus corners
Granny is just [3 dc, ch2, 3 dc] in corners, 3 dc in spaces with ch1 between. Don't do ch2 between side clusters — just ch1, keeps it lacy like your photo. After 4 rounds, tie off cream.

Three squares joined — 2 on top row, 1 bottom point. I use single crochet join in cream for invisible look.
Step 2: Join into triangle — no sewing holes
Lay squares: 2 on top side by side, 1 below centered touching both top squares — forms triangle shape with point down
With cream yarn and 4.5mm hook, join with sc seam:
Top two squares: sc together through both edges — 15 sc across — FO
Bottom square to top: sc 15 sc to left top square, sc 15 sc to right top square — triangle formed
Center where 3 squares meet will have small hole — we cover with green next step
Single crochet join is strongest and looks like a little ridge — I like it. If you prefer flat, whip stitch with needle. Make sure squares are all facing same side.
Step 3: Sage border — green like your photo
Attach green in any top corner ch2 space
R1 (green): sc in corner, ch1, sc in same corner, *sc in each dc and ch space around — 3 sc in each corner* — around whole triangle — sl st to first sc
For top edge (long edge where ties go): After R1, work sc across top — 40 sc across top edge
R2: sc in each sc around, with 3 sc in bottom point tip to keep point sharp, and 3 sc in each top corner — FO
R3 (optional for thicker border like photo): sc again around, same — gives 2-round thick sage border as in your photo — FO
Your photo has 2 rounds of sage green border, thicker at bottom point — I do 3 sc in point every round so it stays pointy not rounded. For center where 3 squares meet, I do a small green V — sc 5 sts across join with green, ch1, sc 5 back — covers hole and matches photo's green accent line.

Sage border — 2 rounds of sc, 3 sc in point. This is the sage green in your photo — muted, not bright.
Step 4: Ties — simple chains that don't curl
Attach green at left top corner, ch 45, sc in 2nd ch and each ch — 44 sc — sl st to corner — FO
Attach green at right top corner, ch 45, sc 44 — FO
Alternative ties: ch 60 without sc for thinner tie — but sc tie doesn't curl
Ties are ch 45 then sc back — 44 sc tie is about 12" long and doesn't curl or stretch. If you want longer ties to wrap around bun, ch 70.
How I wear mine
I tie it with point down back, or point to side for cute look, or fold top edge down 1" for headband style. Cream goes with everything — I wear sage border side out. Wash cold, lay flat — cotton stretches if hung.
If it curls or gaps
Squares not same size: Count clusters — each side should have 3 clusters after 4 rounds. If one has 2, you missed a space.
Center hole big: Normal — cover with green V as described — sc 5 over join in green.
Point not sharp: You forgot 3 sc in point on border rounds — add them.
Border wavy: Too many sc — do sc in each dc, not 2 sc per dc. Just 1 sc per stitch and 3 in corners.
Make it yours
I made one in rust and cream for fall, and one all white with green border for spring — same 3 squares. You can also make with 6 squares for bigger shawl. If you make it, I would love to see how you tie it.

This sage bandana is my go-to when I want something pretty but quick — 3 squares while my coffee brews, border while it cools. I hope it becomes your favorite too. 🌿🤍