Inside my Beginner guide
- Before you begin — my story from my snowy porch
- Materials I used — from my yarn basket
- Sizing — how big my penguin is
- Abbreviations — I explain like we are together
- Full roadmap — 6 steps with my pictures
- Step 1: Body — black and white belly — one piece (with picture)
- Step 2: Head — black and white face — color change tutorial (with picture)
- Step 3: Face — orange beak, eyes and blush (with picture)
- Step 4: Blue hat with white pom-pom (with picture)
- Step 5: Wings and feet — tiny orange feet (with picture)
- Step 6: How my final penguin looks — in snow — finished product (with picture)
- How I finish mine — my little tricks
- Common beginner mistakes & how I fix them
- Ways to make it your own — from my blog
Before you begin — from my snowy porch
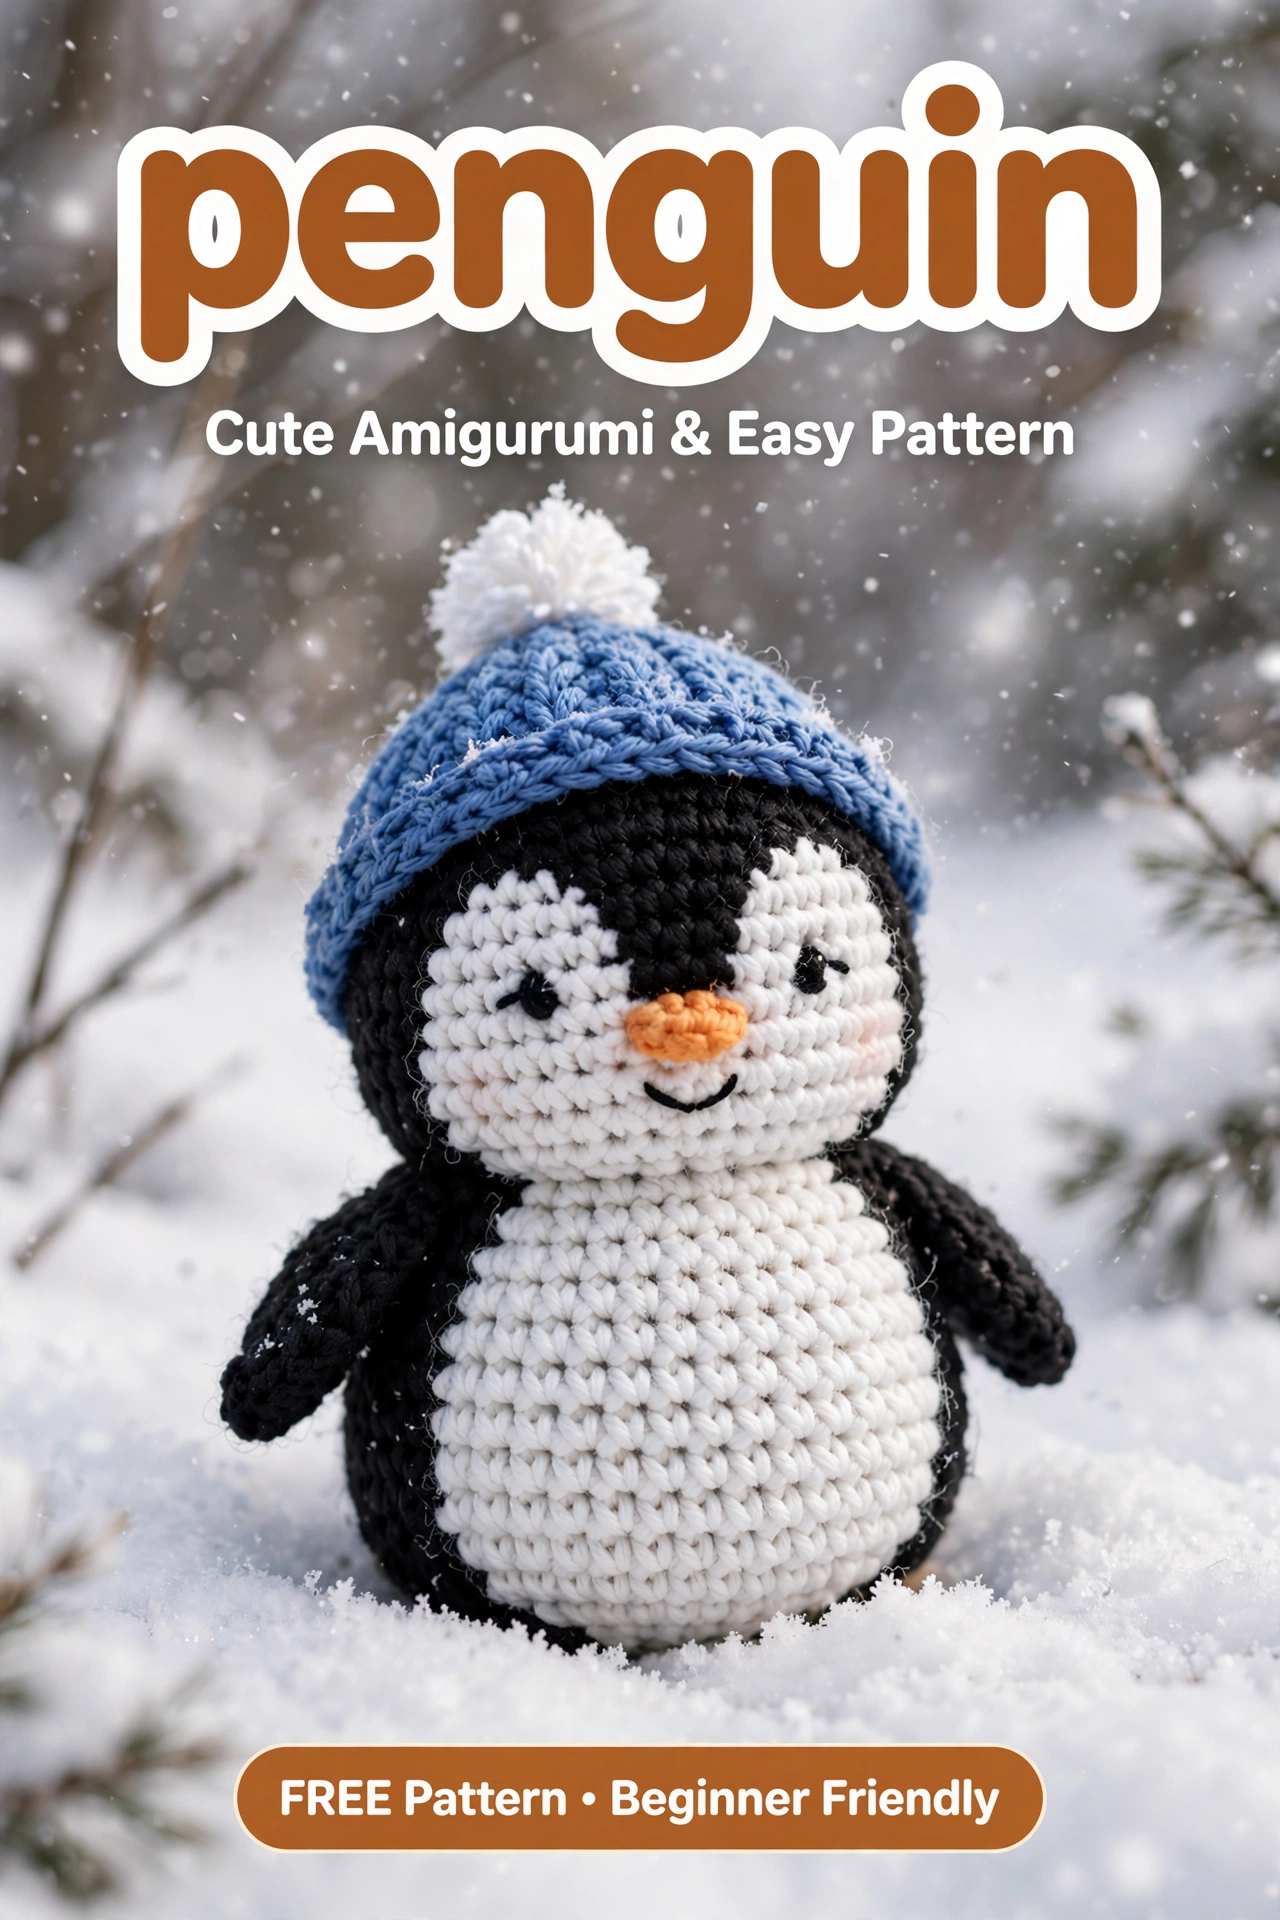
Hi friend, it is Sara here, with my tea going cold because I am watching snow fall on my porch and staring at my little penguin. I have been wanting a winter penguin for a while — not a tall skinny penguin, but a chubby little amigurumi penguin with a big white belly and tiny wings, wearing a blue hat with a white pom-pom on top like in your pin.
I saw that photo with a crochet penguin sitting in real snow, blue hat with snowflakes falling, and I saved it right away. I thought, I need this for my winter tiered tray. So I grabbed worsted yarn in black, white, orange and dusty blue from my basket — Lily Sugar'n Cream and Loops & Threads Impeccable, my favorites, so soft and a little stretchy for amigurumi.
What I love, especially for you if you are just starting, is my penguin is one piece body and head — no sewing head to body, just continuous. The white belly is crocheted with color changes inside the round, not separate pieces sewn on later. That keeps him sturdy and his belly stays centered. I made my first penguin while my soup was simmering, about 1.5 hours with tea breaks.
If you can make a magic ring, single crochet, increase and invisible decrease, you can absolutely make him. I keep tension tight for amigurumi — tight so stuffing does not show — and I count out loud. My first penguin had a wobbly belly and I still love him, he sits on my bookshelf with my winter books.
Materials I used — from my yarn basket
- Black: Worsted — I used 40g black — for head top, back and wings — deep black like my cat at night.
- White: Worsted — about 30g white — for face patches, belly and pom-pom — soft white like snow.
- Orange: Worsted — about 8g orange — for beak and tiny feet — warm orange like clementines.
- Dusty blue: Worsted — about 15g dusty blue — for winter hat with pom-pom — like your pin, cozy blue.
- 4.0mm crochet hook: My favorite Clover — keeps tight tension for amigurumi so stuffing does not show through black.
- Safety eyes 8mm black — or embroidered eyes with black yarn, tapestry needle, stitch markers, polyfill, blush for cheeks optional.
- My winter props: Real snow, pine cones, eucalyptus sprigs, cream linen — I style mine in snow like in your pin for final photo.
Sizing — my penguin
My penguin finished is 5 inches tall — I measured with my ruler — 3.5 inches wide at belly, head 3 inches diameter. Hat is 2 inches tall plus 1 inch pom-pom. With 4mm hook and worsted, gauge is about 20 sc = 4" in the round. If you use chunky, your penguin will be 6.5" taller and chubbier, but still cute — use 5.5mm hook then.
I make him sit upright — flat bottom from decreases — so he sits in snow without tipping like in your pin. He weighs about 60g stuffed.
Abbreviations — I explain like we are together
MR = magic ring — adjustable loop I start with, or ch2 and 6 sc in 2nd ch if MR feels fussy. sc = single crochet — my main stitch, tight. inc = increase — 2 sc in same stitch. dec = invisible decrease — insert hook in front loop of next 2 stitches, yarn over pull through both front loops, yarn over pull through 2 loops — keeps no holes in black. sl st = slip stitch, ch = chain, FO = fasten off. I work in continuous rounds with stitch marker, no joining, so I count rounds. Color change = on last yarn over of sc, yarn over with new color and pull through, so next stitch is new color clean.
Full roadmap — 6 steps with my pictures
1. Body — black back and white belly in one piece — with picture of technique
2. Head — black top with white face patches — color change — with picture
3. Face — orange beak triangle, 8mm eyes, smile and blush — with picture
4. Blue hat with white pom-pom — 2 inch hat — with picture
5. Wings and orange feet — tiny — with picture
6. How my final penguin looks — in snow with falling snowflakes — with picture of my finished set
Step 1: Body — black and white belly — one piece
1My penguin body — how I do black and white in one piece

My body is the base — I work from bottom up, black back and white belly in same rounds, not two pieces sewn later. That way my white belly stays centered and does not shift like some patterns where belly is sewn on crooked. Picture 1 shows my magic ring and color change method.
I start MR black 6 sc. Then I increase in black but I introduce white for belly: For belly, I change to white on last yarn over before belly stitches, work white sc's for belly, then change back to black. Belly is 8 stitches wide at widest, centered in front. I keep black yarn carried behind white loosely, not too tight or body puckers.
Round by round: I increase to 18, 24, 30 — belly white section grows from 2 to 8 stitches as I increase. Then I work straight for body, then decrease to shape bottom flat so he sits. I stuff firmly at end — firm so he sits upright in snow, not floppy.
R1: MR black, 6 sc (6)
R2: inc around (12)
R3: [sc, inc] x6 (18) — start white belly: first 2 sts white, rest black — change color on last YO
R4: [2 sc, inc] x6 (24) — white belly 4 sts wide centered front, black rest
R5: [3 sc, inc] x6 (30) — white belly 6 sts wide
R6-12: sc around — maintain white belly 8 sts wide front, black rest — 7 rounds — body height — like Picture 1
R13: [3 sc, dec] x6 (24) — decrease evenly, keep belly white centered
R14: [2 sc, dec] x6 (18) — stuff firmly now — polyfill firm so sits in snow
R15: [sc, dec] x6 (12), R16 dec around (6), FO close. Flat bottom so sits upright.
Finished body 3.5" tall — black back, white belly centered.
Step 2: Head — black and white face — color change tutorial
2My penguin head — black top with two white face patches

My head is continued from body — one piece, no sewing head to body — I just keep crocheting up from body, no FO. That makes him sturdy and head does not wobble. Picture 2 shows my head with white patches.
I increase head from body: From 6 stitches at top of body, inc to 12, 18, 24, 30 — head bigger than body top, chubby. For white face patches, I have two white ovals on sides of face, not one big white face — like your pin where white is two patches with black stripe down middle. So I work: black 5 sts, white 8 sts, black 4 sts, white 8 sts, black 5 sts = 30 — two white patches with black center stripe for beak area.
I work 5 rounds with this color pattern, then decrease to close top — head 3" diameter. I stuff firmly as I go, so head round and chubby.
R17: inc to 12, R18 inc to 18, R19 inc to 24, R20 inc to 30 — chubby head
R21-25: sc around — color pattern: black 5, white 8, black 4, white 8, black 5 = 30 — two white face patches with black stripe down center — like Picture 2 — 5 rounds
R26: [3 sc, dec] x6 (24), R27 [2 sc, dec] x6 (18) — stuff firmly, R28 [sc, dec] x6 (12), R29 dec around (6), FO close.
Head 3" diameter — black top, white patches for eyes.
Step 3: Face — orange beak, eyes and blush
3My face — orange beak, eyes and smile

My face is what makes him cute like your pin — orange beak triangle in middle black stripe, black eyes on white patches with little eyelashes, tiny smile and pink blush. Picture 3 shows my face close-up.
Beak: Orange — MR 4 sc, inc to 6, sc 2 rounds, flatten to triangle, FO leave tail. Sew centered on black stripe between white patches, between rounds 22-23, pointing down slightly. Eyes: 8mm safety eyes — I place on white patches, between rounds 22-23 as well, about 6 stitches apart, 1 stitch above beak. If using yarn eyes, embroider black French knots. Smile: Black yarn — small curved line under beak, 2 stitches wide, like in pin with tiny smile. Blush: Optional — pink pastel or yarn — small pink dots on white patches below eyes, 2 stitches out from beak.
Beak: Orange MR 4 sc (4), R2 [sc, inc] x2 (6), R3-4 sc around (6), flatten, FO leave tail, sew centered on black stripe R22-23
Eyes: 8mm safety eyes on white patches R22-23, 6 sts apart, 1 st above beak — add tiny eyelash with black — 2 small straight stitches outward from eye top — like Picture 3
Smile: Black yarn curved line under beak, 2 sts wide, blush pink dots on white patches below eyes optional
Finished face friendly — like your pin with smile.
Step 4: Blue hat with white pom-pom
4My winter hat — dusty blue with white pom-pom — like your pin

My blue hat is what makes him winter like your pin — dusty blue hat with ribbed brim and fluffy white pom-pom on top, a little slouchy, covers his black head top. Picture 4 shows my hat.
Hat: Dusty blue — MR 6 sc, inc to 12, inc to 18, inc to 24 — 3" diameter to fit penguin head 3". Then sc 4 rounds straight for hat height 2", then ribbed brim: *front post dc, back post dc* around for 1 round — makes ribbed edge like knit hat. FO leave tail. Pom-pom: White — make pom-pom with white yarn — wrap yarn around 2 fingers 30 times, tie middle, cut loops, trim to 1 inch fluffy ball, sew to top of hat. Hat should sit slightly slouchy, covering top of head and ears area, not too tight.
R1: MR blue 6 sc (6)
R2: inc around (12)
R3: [sc, inc] x6 (18)
R4: [2 sc, inc] x6 (24) — 3" diameter — fits penguin head
R5-8: sc around (24) — 4 rounds — 2" tall — hat height
R9: *FPdc, BPdc* around (24) — ribbed brim — 1 round, FO leave tail
Pom-pom: White wrap 30x around fingers, tie, cut, trim to 1" ball, sew to top center of hat — like Picture 4
Hat 2" tall + 1" pom-pom = 3" total — fits 3" head.
Step 5: Wings and orange feet
5My tiny wings and feet — how I make them

My wings and feet are tiny — black wings 1.5" long, no stuffing so they flop a little like real penguin wings, and tiny orange feet 0.75" that help him sit upright in snow. Picture shows my wings and feet.
Wings x2: Black MR 6 sc, inc to 9, sc 3 rounds (9), dec to 6, flatten, FO leave tail, no stuffing — flatten so they are flat flippers. Sew to sides of body at round 10-11, about 4 stitches out from white belly edge, angled slightly down so they hang like in pin. Feet x2: Orange MR 6 sc, sc 2 rounds (6), flatten, FO leave tail, sew to bottom of body front, 3 stitches apart, small flat feet sticking out front like in snow photo, help him sit without tipping.
R1: MR black 6 sc (6)
R2: [2 sc, inc] x2 (8) — actually inc to 9 with adjustment: [sc, inc, sc] x2 (8) plus one extra? Let's do: [sc, inc] x3 (9)
R3-5: sc around (9) — 3 rounds, R6 dec to 6, flatten, FO no stuff — like Picture 5
My Feet x2 — Orange — 4mm:
R1: MR orange 6 sc (6), R2-3 sc around (6), flatten, FO leave tail, sew to bottom front 3 sts apart
Sew wings at R10-11 sides, feet at bottom front — helps sit in snow.
Step 6: How my final penguin looks — in snow — my finished set
6How my finished penguin looks in real life — from my porch in snow

This is how my finished penguin looks in real life on my porch in snow — I wanted you to see front, size and how he sits before you start, so you know what you are making. He is 5 inches tall, 3.5 inches wide at belly, black back and white belly, white face patches with black eyes and orange beak, tiny smile, dusty blue hat with white pom-pom 2" tall + 1" pom-pom.
He sits upright — flat bottom from decreases — so he sits in snow without tipping like in your pin with snowflakes falling. For size, he fits in my hand — my palm covers his belly, hat pom-pom sticks up above my fingers. I have been keeping him on my winter tiered tray since December and he still looks new — I spot clean with damp cloth if snow melts on him.
I style him in snow like your pin — I scoop a little snow onto my porch table, place pine cones and pine branches around, put penguin in middle, take photo at 10am when light is soft and snow falling like in pin. For indoor photos, I use white faux fur fabric with cotton ball snow and my cream linen throw.
How I finish mine — my little tricks from my porch
I weave all tails inside with tapestry needle — I push needle through matching color a few times before cutting so tail does not pop out later in snow. I weave black through black, white through white, orange through orange, blue through blue.
I stuff my penguin firmly — firm so he sits upright in snow and holds hat, not floppy. My first penguin I stuffed lightly and he tipped over in snow photos, now I stuff firmly and he sits stable even on soft snow.
My snowy porch moment for beginners: I made my penguin last weekend with cinnamon tea and snow falling on my window, my cat sitting on my windowsill watching snowflakes. It took me an afternoon — 45 min body and head one piece, 20 min face and beak, 20 min hat with pom-pom, 15 min wings and feet, plus 10 min assembly. I put on my winter playlist — my cozy acoustic — so relaxing to watch him appear stitch by stitch, you will love it. If you get stuck on color changes for white belly, send me a message on my blog, I answer every message and I can send you a little video of my hands changing from black to white.
Common beginner mistakes & how I fix them — from my blog
- White belly off-center / crooked: Did not count belly stitches centered — belly should be 8 sts wide front center. Count from center front, mark with stitch marker where white starts.
- Stuffing shows through black: Tension too loose — black shows white stuffing — keep even tight tension, 4mm hook, worsted. If stuffing shows, go down to 3.5mm hook or use black polyfill.
- Head wobble / body not one piece: Cut yarn between body and head — I work head continued from body, no FO between, so no wobble. Keep continuous rounds.
- Face patches not symmetric / eyes uneven: Count white patches — 8 sts each with 4 sts black stripe between for beak — measure with ruler to center. Eyes 6 sts apart, 1 st above beak.
- Hat too tight / does not fit: Hat diameter should be 3" to fit head 3" — need 24 sts around. If too tight, add increase round to 30 sts, then sc 4 rounds.
- Penguin tips over in snow: Not stuffed firmly or bottom not flat — stuff firmly and make bottom flat from decreases — R15 dec to 12 then 6 — flat bottom helps sit.
Ways to make it your own — from my blog
- Color swap: Try gray and white penguin with red hat for Christmas, or pink hat for Valentine's — I have pink version on my blog too.
- Different hat: Make earflap hat, striped hat, or no hat — my penguin without hat is still cute for summer — I have hatless version on my shelf.
- Add scarf: Tiny scarf — chain 30, sc back, wrap around neck — blue and white striped scarf matches hat — so cozy for winter photos.
- Keychain version: Make mini penguin 3" with 3.5mm hook and add key ring on top of head — for backpack charm — about 45 min, my daughter has mini on her backpack.
- Family set: Make 3 penguins — big 5", medium 4", small 3" — for family display in snow — about 4 hours total, my family has set on mantel for winter.
- Add baby penguin: Tiny baby penguin 2" without hat — sits next to big penguin — I made baby with MR 6 sc to 12 only, so cute for tiered tray.
Thanks for making with me — from my porch
I hope you love making my little winter penguin as much as I loved making mine — he has been sitting in the snow on my porch all week and I keep looking at him when I bring in firewood. He is so chubby and cozy and my friends always ask how I made his blue hat.
If you make a penguin, I would love to see your snowy styling — tag me on my blog or Instagram @sara.rain.crochet, I keep all your penguin photos in a little folder on my phone and I look at them when I need cozy inspiration for my next winter design.
Happy crocheting, friend!
