Inside this pattern
- Before you begin
- Materials I used
- Sizing & what you'll need
- Abbreviations
- Full roadmap - 5 steps
- Step 1: Crochet the bat body (one piece)
- Step 2: Pointy ears
- Step 3: Orange wings with black border
- Step 4: Assemble & face details
- Step 5: Beaded keychain & styling
- How I finish mine
- Ways to make it your own
Before you begin
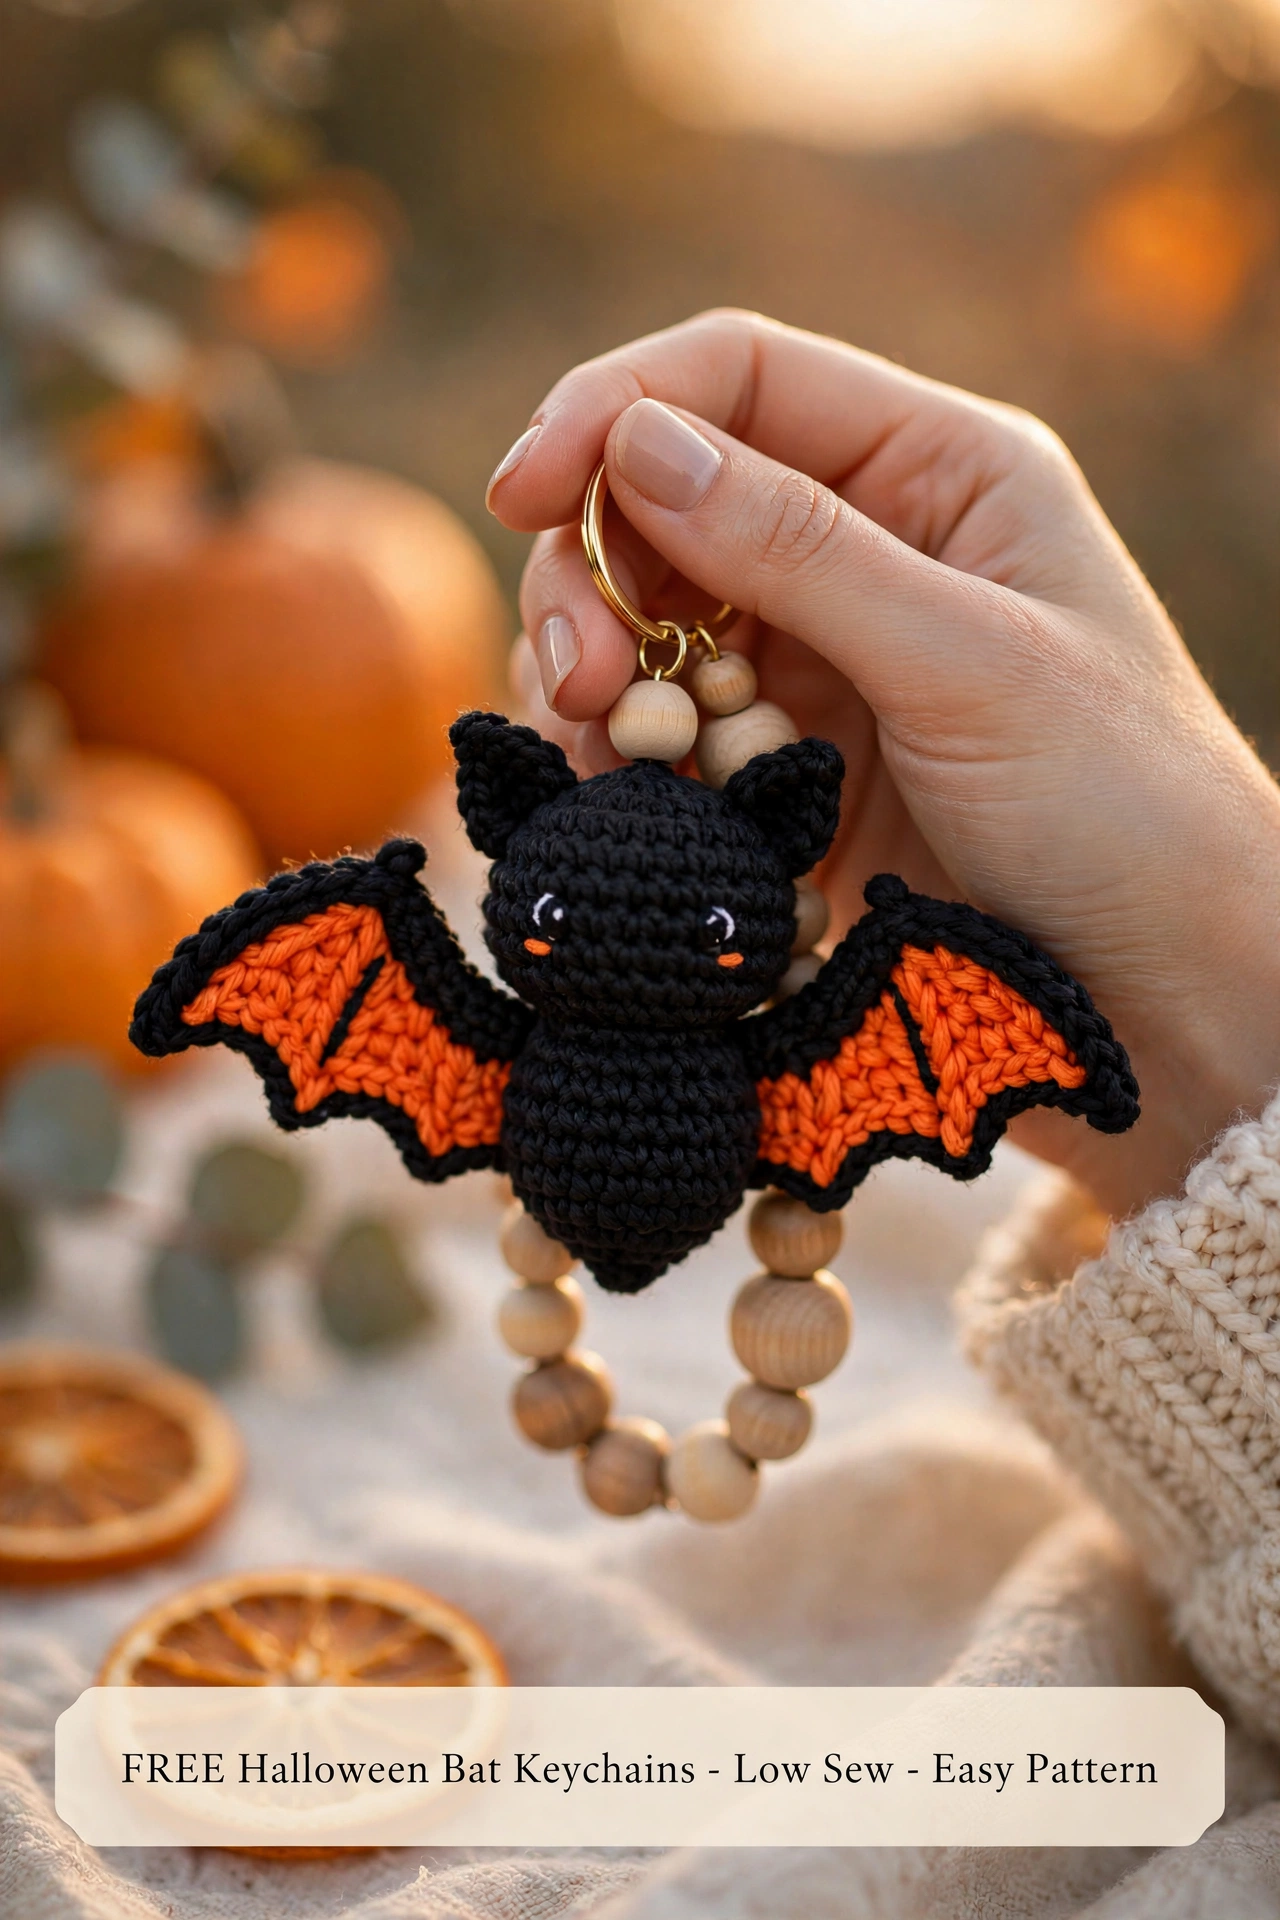
I've been wanting a bat keychain for my fall bag for ages — not a scary one, but that chubby little bat with big shiny eyes and bright orange wings that pops against black yarn. I saw that golden hour pin with the hand holding the bat keychain over pumpkins and dried oranges, and I knew I had to recreate it.
What I love about this version is it's truly low sew. Head and body are one piece crocheted top-down, ears are tiny and fast, and wings are flat with that cute black outline that makes the orange glow. The wooden bead wristlet is what makes it look like the viral 2026 bag charm trend.
If you can do magic ring and single crochet, you can make this. I keep my tension a little tight with black yarn — black shows gaps easily — so I use a 3.0mm hook even with worsted. I count out loud and use a stitch marker.
Materials I used
- Black yarn: Worsted cotton — I used Lily Sugar'n Cream black, about 35 yards for one bat. This is the main body you see in the pin.
- Pumpkin orange yarn: Same weight — about 15 yards for wing centers. I used a true pumpkin orange, not rust.
- 3.0mm crochet hook: Keeps black stitches tight so stuffing doesn't show.
- Safety eyes: 6mm black (2 per bat) — small for keychain kawaii look. I add them between R8-9, 6 sts apart.
- Blush: Tiny orange yarn or pink chalk — 2 little stitches under eyes like in pin.
- Keychain hardware: Gold key ring + lobster clasp, 12mm & 16mm wooden beads — natural and tan mix, 12 beads total for wristlet.
- Stuffing: Polyfill — small handful.
- Tapestry needle, scissors, stitch marker, black embroidery thread for wing lines.
- Props for styling (optional): Mini pumpkins, dried orange slices, cream linen, golden hour light — exactly like your pin.
Sizing & what you'll need
Bat is 3" tall, 2" wide body, wingspan 4.5" — ideal for keys and backpacks. With 3.0mm hook and worsted, you get tight fabric that hides white stuffing under black. If you use DK, bat will be 2.2" — extra mini, cute for zipper pulls.
Cotton is best for keychains — it doesn't pill in your pocket like acrylic. The wings stay pointy and the orange stays bright even after lots of use.
Abbreviations
MR = magic ring, sc = single crochet, inc = increase (2 sc in same st), dec = invisible decrease, hdc = half double crochet, dc = double crochet, sl st = slip stitch, ch = chain, FO = fasten off. Work in continuous rounds unless noted.
Full roadmap - 5 steps
1. Bat body - one piece, top-down (18 rounds)
2. Ears x2 - pointy, no sew fold
3. Wings x2 - orange center with black border (5 rows)
4. Assemble - eyes, blush, ears, wings, embroidered wing lines
5. Beaded keychain - wooden beads + gold ring + styling
Step 1: Crochet the bat body (one piece)
I start from top of head with black. Head and body are one piece so you don't sew them. Tight tension is key for black.
R1: MR, 6 sc (6)
R2: inc x6 (12)
R3: [sc, inc] x6 (18)
R4: [2 sc, inc] x6 (24)
R5-8: sc around (24) — 4 rounds straight, head
R9: [2 sc, dec] x6 (18) — start neck
R10: [4 sc, dec] x3 (15)
R11: [4 sc, inc] x3 (18) — start body wider
R12: [2 sc, inc] x6 (24)
R13-15: sc around (24) — 3 rounds chubby belly
R16: [2 sc, dec] x6 (18) — stuff firmly, push to sides
R17: [sc, dec] x6 (12)
R18: dec x6 (6), FO, close with needle, weave tail. Leave small point at bottom — I don't round it fully, gives bat shape like pin.
Step 2: Pointy ears
R1: MR, 4 sc (4)
R2: [sc, inc] x2 (6)
R3: [2 sc, inc] x2 (8)
R4: sc around (8)
Flatten, sc through both layers across (4), FO leave tail.
Sew to top of head at R2-3, 5 sts apart, tilted slightly out — pointy up like in pin.
Step 3: Orange wings with black border
Wings are what everyone saves from the pin — orange center with black outline and that little embroidered line. Crocheted flat, then bordered.
Row 1: With orange, ch 6, sc in 2nd ch and across (5)
Row 2: Ch1, turn, inc, 3 sc, inc (7)
Row 3: Ch1, turn, sc across (7)
Row 4: Ch1, turn, inc, 5 sc, inc (9)
Row 5: Ch1, turn, sc 3, hdc 3, sc 3 (9) — gives scallop bottom
Switch to black — do NOT cut orange yet, carry it.
Border: With black, sc around entire wing, 3 sc in tip point for sharp bat wing, 2 sc in corners. FO orange & black, leave long black tail for sewing.
Wing line detail (like pin): With black thread, embroider one straight line in middle of orange, from base to point — 1 stitch long.
Second wing: Make same but mirrored — so scallops face same way when sewn. They should be little bat wings with 3 points at bottom edge.
Step 4: Assemble & face details
Quick and so cute. Lay out body, 2 ears, 2 wings.
Assembly:
1. Eyes: Already in, add white shine stitch — tiny white diagonal near top of each eye.
2. Blush: With orange yarn, 2 tiny horizontal stitches under each eye, 1 st wide — like in your golden hour pin.
3. Ears: Sew to top R2-3, pointy.
4. Wings: Pin to sides at R11-13, black border edge against body. Sew with black tail, 4-5 sts only — wings stick out like airplane. I leave them slightly floppy so they move on keychain.
5. Wing lines: Embroider black line in center of orange.
Step 5: Beaded keychain & styling
This is what makes it the 2026 trend — wooden beads + gold hardware like in your pin with the hand holding it.
Keychain:
- Thread gold key ring through top of head (R1), add lobster clasp.
- String: 1 wood bead (12mm), bat, then 10 beads below to make loop wristlet — I do pattern: tan, natural, tan, big natural, tan... like pin. Tie sturdy knot, hide tail in bat head.
- For bag charm version, skip bottom loop — just 3 beads on top like pin shows.
My styling for photos (copy your pin):
- Hold in hand with gold ring between fingers, nails natural — golden hour light from window at 6pm
- Background: mini orange pumpkins, dried orange slices, cream linen, eucalyptus
- Second shot: clip to tote bag with fairy lights blur
How I finish mine
I weave all black tails inside, then roll bat in hands to even stuffing — keeps bottom pointy, not round. I brush black yarn with soft toothbrush to fluff and hide any white.
For the golden hour photo, I shoot at 5:45pm near window — that warm light makes orange wings glow against black. My wooden beads I lightly sand so they feel soft in hand — that's the handmade touch people love.
My kitchen table moment: I made this bat keychain Wednesday with chai and leaves blowing outside. 45 min total — 20 min body, 10 min wings, 10 min ears + face, 5 min beads. Put on fall playlist, so cozy.
Thanks for making with me
This little bat keychain is exactly the viral Halloween bag charm trend for 2026 — spooky cute, kawaii, quick to make and perfect for keys, totes and backpacks. I hope you love seeing it swing when you walk through pumpkins in golden hour.
If you make one, I'd love to see it on your keys or bag — tag me, I keep all your photos in a little folder on my phone.
Happy crocheting!

Ways to make it your own
- Color swap: Black + purple wings for midnight vibe, or black + pink for spooky cute.
- No beads: Just gold ring + bat for minimal keychain — my daughter prefers this.
- Smaller hook: 2.5mm gives tighter 2.5" bat — perfect for zipper pull.
- Big wings: Add one more increase row for dramatic 5.5" span — great for bag charm photos.
- Glow eyes: Use glow-in-dark safety eyes for Halloween night — so fun!