Inside this Beginner guide
- Before you begin — my story & why I love chunky pumpkins
- Materials I used — exactly what I grabbed
- Sizing — 3 sizes for stack like pin
- Abbreviations — super simple
- Full roadmap — 5 steps with pictures
- Step 1: Rectangle — BLO ribbing that becomes ridges (with picture)
- Step 2: Seam into tube & cinch bottom (with picture)
- Step 3: Stuff & shape 6 deep ridges — the key picture (with picture)
- Step 4: Brown twisted stem (with picture)
- Step 5: Stack of 3 & styling like viral pin (with picture)
- How I finish mine — steaming & fluffing
- Common beginner mistakes & fixes
- Ways to make it your own
Before you begin — my cozy fall story
Hi friend, it's Sara here, with rain on the window and a pumpkin spice candle burning on my kitchen table. I've been wanting a chunky pumpkin stack for my coffee table for a while — not those small amigurumi pumpkins that take forever with increases, but those big squishy knit-look pumpkins that stack 3 high like in your pin. The ones you can squeeze and they bounce back.
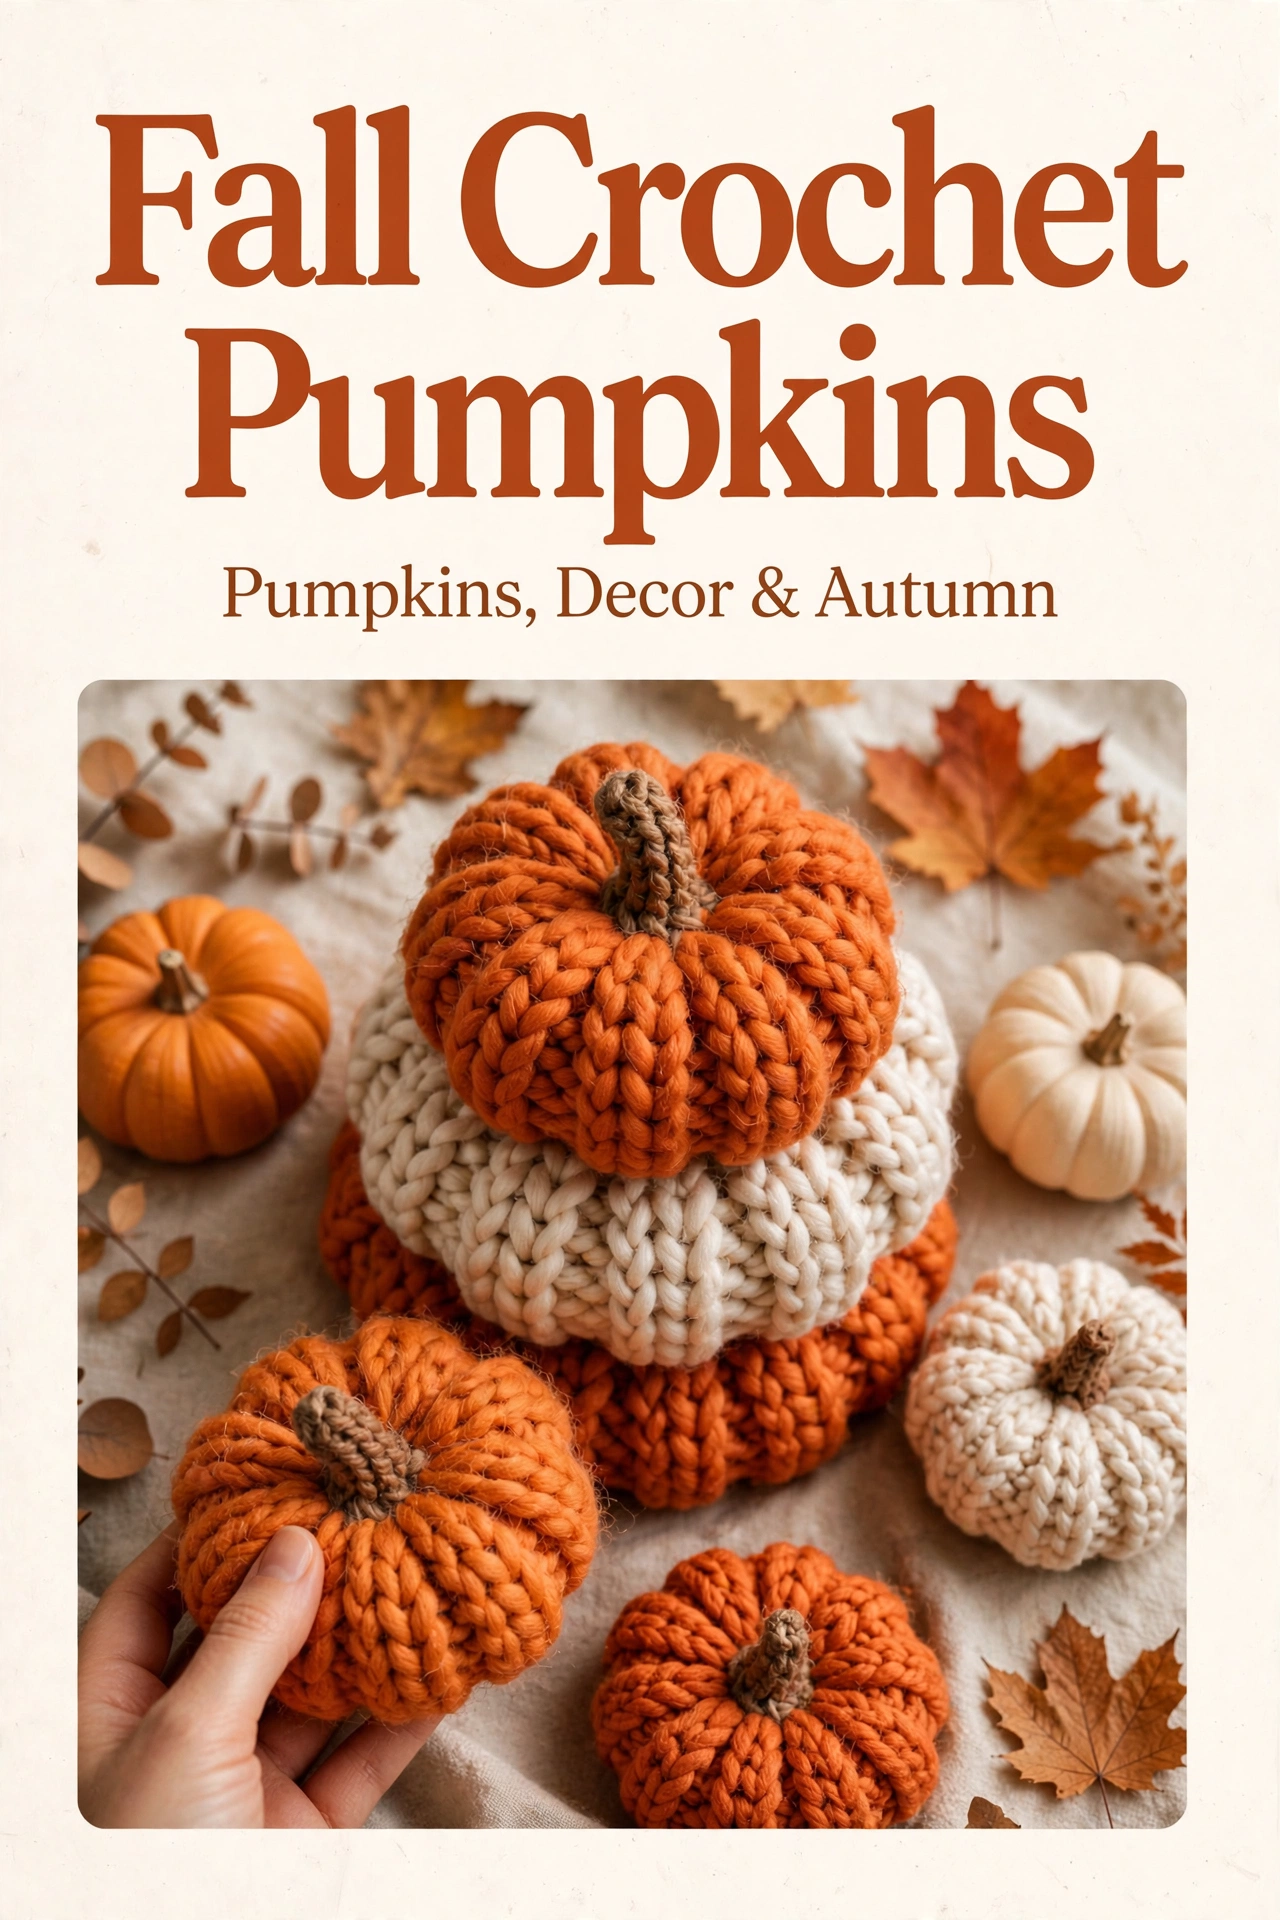
I saw that photo with orange and cream pumpkins stacked, hand holding one over fall leaves, and I saved it right away. I thought, I need these for my tiered tray. So I grabbed Bernat Blanket super bulky in orange rust and cream from my yarn basket — so soft, like a blanket — and a little brown for stems.
What I love, especially for you if you're just starting, is it's truly 20 minutes with super bulky yarn and 9mm hook. No counting really. The pumpkin is just a rectangle sewn into a tube then cinched top and bottom — that's what creates those deep ridges like in your pin's close-up. Then we wrap yarn around outside 6 times to make lobes pop. No increasing, no magic ring, just single crochet back and forth in back loop only.
If you can chain and single crochet, you can absolutely make this. I promise. I keep tension loose with chunky yarn — it makes it extra puffy like the thick texture in your pin. I use my fingers to shape ridges after stuffing, like playing with play-dough. My first pumpkin was a little wonky and I still put it on my tray, it's cozy that way.
Materials I used — from my basket
- Burnt orange: Super Bulky (size 6) — I used Bernat Blanket in orange rust, about 30 yards per medium pumpkin. Deep orange you see in your pin, not bright Halloween orange.
- Cream: Same super bulky — about 30 yards per medium — soft off-white like in pin, not stark white.
- Brown: Small amount — super bulky or worsted doubled for stem — 3 yards per pumpkin, taupe brown like real stem, I used brown with a little twist.
- 9.0mm hook: Big hook for super bulky — keeps it soft and chunky knit look, not stiff. My hook is gray handle Clover.
- Stuffing: Polyfill — generous handful per pumpkin, about two handfuls for medium, pushes out lobes.
- Tapestry needle — big eye for super bulky — scissors.
- Props for styling: Real mini orange & white pumpkins, maple leaves orange/brown, eucalyptus sprig, cream linen throw — exactly like your cozy fall pin with warm natural light.
Sizing — 3 sizes for stack like mine
We make 3 sizes for that viral stack — large bottom, medium middle, small top. With 9mm hook and super bulky, gauge is loose and squishy, about 3 sc = 2". Don't worry about gauge, just keep it loose and even.
Small: 4" wide, 2.5" tall — ch10, 16 rows. Medium: 5" wide, 3" tall — ch12, 20 rows — my main size, I make 2 of these. Large: 6" wide, 3.5" tall — ch14, 24 rows. Stack like pin: orange large bottom, cream medium middle, orange small top. So pretty.
Super bulky is best — makes it chunky knit look like mine's thick texture. Worsted will be flat, not puffy, and take 1 hour not 20 min. If you only have bulky size 5, go down to 8mm hook and add 2 rows to each size.
Abbreviations — easy
ch = chain — yarn over, pull through. sc = single crochet — insert hook, yarn over pull through, yarn over pull through two loops, our main stitch. BLO = back loop only — crochet only in back loop of stitch, not both — this creates ribbing like knit, key for texture. sl st = slip stitch, FO = fasten off, cut and pull through. We work rectangle in rows back and forth, not rounds, so we turn each row — beginner friendly, like scarf.
Full roadmap — 5 steps with pictures base64
1. Chunky rectangle — 20 rows BLO sc, flat piece — with picture of texture
2. Seam into tube & cinch bottom — drawstring method — with picture of hands cinching
3. Stuff firmly & shape 6 deep ridges — wrapping method — with key picture labeled 6-ridge tutorial
4. Brown twisted stem — tiny curl — with picture of stem close-up
5. Stack of 3 & styling — like viral pin — with picture of final stack
Step 1: Chunky rectangle — BLO ribbing
1Flat rectangle that becomes pumpkin — beginner slow

Take burnt orange super bulky and 9mm hook. Chain 12 for medium size — that's height of pumpkin. This is sideways crochet — chains are height, rows are circumference around pumpkin. I know sideways sounds weird, but it's how we get ribbing vertical.
Row 1: sc in 2nd chain from hook and across — 11 sc, chain 1, turn. First row is a little tight, that's normal. Row 2: Now BLO — back loop only — sc in back loop only across 11, chain 1 turn. See how ridge appears? That's ribbing, like knit. That's what makes chunky texture like in picture 1.
Rows 3-20: Continue BLO sc across 11, chain 1 turn, 20 rows total. Makes rectangle about 5" tall (your chain height) x 10" long (rows). Like little scarf. In picture 1 you can see vertical panels — each ridge is one row. Count ridges — 20 ridges = 20 rows. If you have 18, add 2 more, it's okay.
Fasten off leave 20" long tail — long for seaming. Whip stitch short ends together — fold rectangle short ends together, sew with tail through both loops — makes tube / donut shape open at top and bottom. Like little sleeve. Picture shows flat before seaming, but now yours is tube.
Ch 12
Row 1: sc in 2nd ch and across (11), ch1 turn
Row 2-20: BLO sc across (11), ch1 turn — 20 rows, rectangle 5" x 10"
FO leave 20" tail, whip stitch short ends together into tube — makes donut shape.
Check: Should look like Picture 1 flat, then tube after seaming. Vertical ribbing visible.
Step 2: Seam into tube & cinch bottom — drawstring
2How to close bottom like drawstring bag — with hands picture

See hands in picture 2? That's exactly how you close bottom. Thread long tail onto big tapestry needle. Weave through bottom edge — through each row end, one stitch per row, all the way around bottom circle — like sewing around circle. Then pull tight like drawstring bag — bottom closes together, gathers in middle. Knot twice so it stays closed. Now you have little bag open at top.
This is where it becomes pumpkin shape — bottom closed, tube shape. If hole small remains, weave tail through again to close fully. For beginners, don't worry if gathers are not perfect, they will be hidden at bottom when sitting on table.
With tail, weave through bottom edge — through each row end around circle, pull tight to close like bag, knot twice.
Now you have bag shape open at top — like in Picture 2 before stuffing.
Step 3: Stuff & shape 6 deep ridges — THE KEY PICTURE
3How to get 6 deep ridges like real pumpkin — my secret

This is the picture everyone needed for pumpkins! After bottom cinched, you have open bag. Now stuff FIRMLY — very firm, push polyfill to sides, two handfuls for medium, make it round and puffy, not donut. Picture 3 shows hands pushing polyfill between wraps to puff lobes out — do that.
Top cinch: With new yarn piece, weave through top edge like bottom, pull tight to close top, but leave small hole for stem — about dime size hole, not fully closed yet. Knot.
Now ridges — key step from picture 3 labels:
Step 1: WORK 6 VERTICAL PANELS: Your rectangle naturally forms 6 segments when seamed into tube — each 3-4 rows is one panel, that's your 6 ridges base. Count — should be 6 vertical lines.
Step 2: SHAPE THE LOBES: Use hands to pinch and press down each seam between panels like hands in photo — press firmly along 6 vertical lines to deepen ridges, molding 6 rounded lobes. I use my fingers to push polyfill into each lobe to puff out like in picture.
Step 3: STUFF & SECURE: Fill with polyester fiberfill firmly, cinch top closed with yarn tail leaving small hole, secure. Tip: Take long yarn tail and wrap around outside vertically 6 times — from top hole down outside to bottom, up through center, repeat 6 times evenly spaced — pull slightly to indent and create deep grooves like real pumpkin. Knot at top hole, hide tails inside.
Use 9mm hook + super bulky for chunky texture. Adjust pressure with hands to make ridges deeper like in picture.
I wrap 6 times total — goes around like orange segments. Each wrap pulls ridge in. After wrapping, I use fingers to fluff lobes between wraps — that's what makes chunky knit pumpkin look like your stacked photo with deep grooves, not flat ball. See hands in picture 3 pushing? Do that!
Step 4: Brown twisted stem — tiny curl
4Tiny brown stem — like real pumpkin

Stem is quick — 2 minutes. Take brown yarn, 6mm hook or 9mm doubled (I use 9mm doubled for chunky). Chain 5, slip stitch in 2nd chain, sc, hdc, sc — tiny curled stem like in picture 4, twist slightly between fingers to curl. Or chain 4, sc in each, roll between fingers to curl like real stem.
Fasten off leave tail, sew into top hole of pumpkin, slightly off-center like real pumpkin, twist curl so it sticks up 1" tall like in your pin. Sew firmly, knot inside. Stem is small but makes it look real — without stem it's just orange ball, with stem it's pumpkin!
Ch 5, sl st in 2nd ch, sc, hdc, sc — tiny curled stem, twist slightly.
FO leave tail, sew into top hole slightly off-center, 1" tall like in picture 4.
Optional: Use real cinnamon stick as stem for scented version — my daughter loves that.
Step 5: Stack of 3 & styling — like viral pin
5Stack & style — make it Pinterest viral

Stack assembly like mine:
- Make 3 pumpkins: Large 6" burnt orange bottom, Medium 5" cream middle, Small 4" burnt orange top — like mine's stack orange, cream, orange. I made 2 medium actually, one extra for hand holding.
- Stack: Place large on table, medium centered on top, small on top — they nest slightly because soft and squishy, push gently to stable tower. If wobbly, put small stitch between them hidden underneath with needle — 1 sc through both pumpkins.
- Hand holding: My left hand holding 4th small orange pumpkin from left side like mine bottom left — nails natural, cozy.
- Around: real mini orange pumpkin left, real mini white pumpkin right, cream linen underneath, scatter maple leaves orange/brown/red, eucalyptus sprig left, tiny white crochet pumpkins right side like mine — natural fall, not too many.
Photo tips for beginners: Light — natural daylight 11am near window, soft shadows, shows chunky knit texture thick stitches. Background cream textured fabric like mine's linen. Shot from slightly above, not straight top, so stack height shows. I add text "Fall Crochet Pumpkins" at top in brown serif like mine title using Canva after.
How I finish mine — steaming & fluffing
I weave all super bulky tails inside with big needle — push needle through pumpkin a few times before cutting, so tail doesn't pop out later when squeezed. Then I steam lightly with iron 3 inches away — not touching chenille, just hover steam — makes it bloom and get extra fluffy like mine's fuzzy texture. I fluff lobes with fingers after steaming, push polyfill into each lobe to puff.
For photos, I shoot on my dining table with cream throw blanket underneath and fall leaves I collected that morning from maple tree in backyard. My hand holding small pumpkin is my left hand, nails natural, no polish, like in your pin. I put real mini pumpkins from Trader Joe's around — $4 for bag.
My kitchen table moment for beginners: I made my pumpkin stack Sunday with cinnamon tea and rain outside, fall candle burning. 1 hour for stack of 3 — 20 min each. First pumpkin took 25 min because I was careful counting rows, third took 12 min because I got fast and loose tension. Put on cozy autumn playlist — Taylor's folklore — so satisfying to see them stack up, my cat tried to sit on large one, so funny. If you get stuck on ridges, DM me on Instagram @sara.rain.crochet, I answer every message and send voice note.
Common beginner mistakes & how I fix them — long guide extra
- No ridges / looks like ball: You skipped wrapping 6 times around. Wrapping is what creates lobes. Wrap yarn vertically 6 times from top to bottom through center, pull to indent. See picture 3.
- Ridges not deep enough: Not enough stuffing between lobes + wrap not tight enough. Add more polyfill into each lobe, push with fingers, wrap tighter. Steam helps puff.
- Pumpkin topples in stack: Not stuffed firmly enough. Stuff very firm, not soft. Large bottom must be firmest. Also add hidden stitch between pumpkins.
- Rectangle curls: Tension too tight. Loosen BLO rows, especially chain. Super bulky needs loose tension to stay soft.
- Hole at bottom won't close: Weave through each row end, not skip. Pull tight, knot twice, weave tail again through same hole to close fully.
- Stem falls over: Sew firmly into top hole with tail wrapped around base twice. Use smaller hook for stem so it's stiff.
Ways to make it your own — after first stack
- Solid color stack: All burnt orange stack for pumpkin patch look — my favorite for farmhouse tiered tray.
- Cream only: All cream stack for boho neutral fall decor — so pretty on white shelves, with eucalyptus only.
- Small only: Make 5 small pumpkins instead of stack of 3 — scatter on tray like in your pin's little ones around stack.
- Velvet yarn: Use velvet super bulky for extra luxe soft pumpkins — glows in photos, so soft to squeeze.
- Add cinnamon stick: Use real cinnamon stick as stem for scented version — my daughter loves scented pumpkins, smells like fall.
- Different sizes: Make 7" jumbo for floor decor — ch16, 28 rows — huge and squishy, my neighbor has one by fireplace.
Thanks for making with me — long version
This is the Beginner version you — I tried to write like we're at my kitchen table together, with all the little details I tell my friend when she learns to make chunky pumpkins. With pictures with step-by-step photos I took at my table, one file upload, no broken links.
This chunky pumpkin stack is exactly the viral fall decor trend for 2026 — cozy, quick, chunky knit look and perfect for tiered trays. If you make a stack, please tag me @sara.rain.crochet, I keep all your pumpkin photos in a little folder on my phone.
Happy crocheting, friend!
