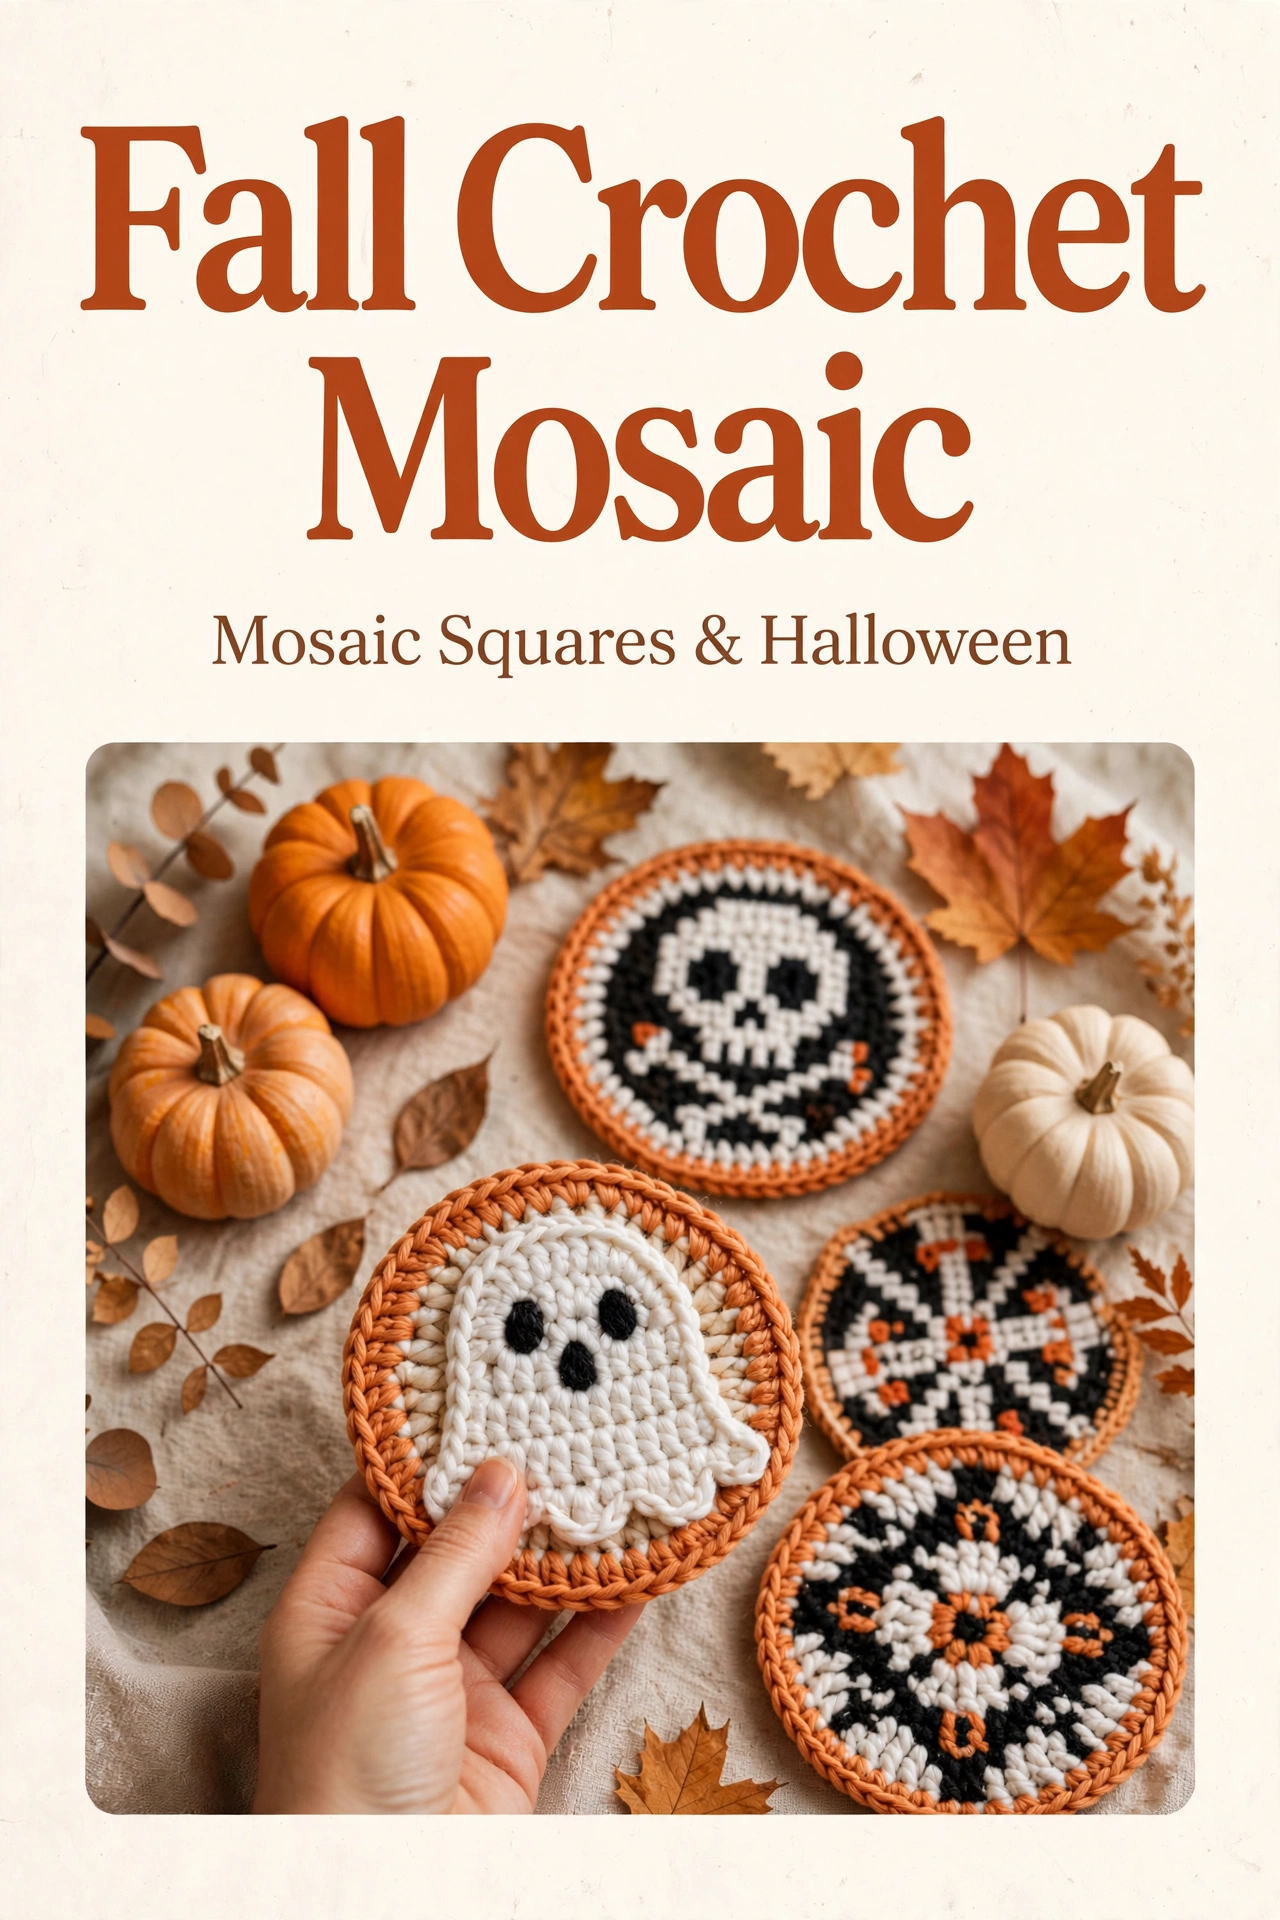
Inside my Beginner guide
- Before you begin — my story from my kitchen table
- Materials I used — from my yarn basket
- Sizing — how big my coasters are
- Abbreviations — I explain like we are together
- Full roadmap — 6 steps with my pictures
- Step 1: Mosaic technique — how I do it for beginners (with picture)
- Step 2: My ghost coaster — white ghost on black (with picture)
- Step 3: My skull coaster — skull & crossbones (with picture)
- Step 4: Orange border — how I finish each coaster
- Step 5: My fall styling — pumpkins & leaves on my table (with picture)
- Step 6: How my final coasters look — my finished set (with picture)
- How I finish mine — my little tricks
- Common beginner mistakes & how I fix them
- Ways to make it your own — from my blog
Before you begin — from my kitchen table
Hi friend, it is Sara here, with my tea going cold again because I am staring at my new coasters. I have been wanting mosaic coasters for a while — I love how mosaic crochet looks like little tiles or pixels, but I was nervous it would be hard. It is not! It is just single crochets and a little reading of X's on a chart.
I have been seeing Halloween coasters everywhere this fall — little ghosts and skulls on black with orange borders — and I thought, I need these for my coffee table. My table gets rings from my tea mugs and I needed something cute and washable. So I grabbed worsted cotton in black, white and burnt orange from my basket — Lily Sugar'n Cream, my favorite, so sturdy for coasters and does not melt like acrylic with hot mugs.
What I love, especially for you if you are just starting, is mosaic in the round is very forgiving. We work in circles, one color per round, and we follow a chart where X means something. No color changes inside a round, so no tangles. I made my first ghost coaster while my laundry was drying, about 35 minutes, then made the skull one while watching the rain. The set of 4 took me an afternoon, about 2 hours with tea breaks.
If you can chain, single crochet and double crochet, you can absolutely make these. I keep tension even — mosaic needs even tension so the picture shows — and I count my X's out loud. My first ghost had one eye bigger and I still use it, it is charming that way.
Materials I used — from my yarn basket
- Black: Worsted cotton — I used Lily Sugar'n Cream black, about 15 yards per coaster — deep black background like night sky for my ghost and skull.
- White: Same cotton — about 10 yards per coaster — bright white for ghost and skull, like little sheet ghost.
- Burnt orange: Same cotton — about 8 yards per coaster — warm orange like my pumpkins, for border like in my photos.
- 4.0mm crochet hook: My favorite Clover Amour — keeps stitches even for mosaic so picture is clear.
- Tapestry needle — for weaving tails — scissors, stitch markers.
- My fall props: My mini orange pumpkins, white mini pumpkin, maple leaves orange and brown, eucalyptus, pine cones, cream linen — I style mine on my table like I love for Halloween.
Sizing — my coasters
My coasters finished are 4.5" diameter — I measured with my ruler — perfect for my mugs, my tea cup and even my little pumpkin spice latte mug. Each coaster is about 8 rounds of mosaic in the round, then 1 round orange border. With 4mm hook and worsted cotton, gauge is about 4 sc = 1". If you use acrylic, your coaster will be a little bigger and softer, but cotton is better for heat and absorbency, so I use cotton.
I make 4 coasters for a set — ghost, skull, and 2 geometric stars in black/white/orange like in my photos — but you can make just one ghost if you are short on time, it is still so cute alone.
Abbreviations — I explain like we are together
ch = chain — yarn over pull through. sc = single crochet — insert, yarn over pull through, yarn over pull through two loops — our main mosaic stitch. dc = double crochet — yarn over, insert, yarn over pull through, yarn over pull through two, yarn over pull through two — taller for mosaic overlay. BLO = back loop only — for mosaic, we sometimes work in back loop to create texture. X on chart = mosaic stitch — in my overlay mosaic, X means you work a dc in front loop of stitch 2 rows below, creating the picture. I use dc not sc because dc is taller — it has to reach down two rows and still stand proud of the current row, a sc is too short and would not pop. I will walk you through chart reading slowly with my pictures, I promise. MR = magic ring, sl st = slip stitch, FO = fasten off.
Why I work single motif in the round — and easier alternative from my table
Hi friend, I want to be honest from my kitchen table — mosaic in the round with a single centered picture is a little tricky. The usual easy way for mosaic coasters is to work flat in rows as a square, then add an orange border — that way your chart is read row by row and you naturally get one centered ghost without worrying about repeats around a circle. That flat square method sidesteps the repeat problem entirely and is much easier to explain correctly.
For my round coasters like in my photos, I made it work by NOT repeating my 12-stitch chart around the whole 36-stitch round. I work 12 plain stitches, 12 chart stitches, 12 plain stitches. That gives one ghost. If I had repeated the chart 3 times around, I would have gotten 3 small ghosts tiled around, not one big centered ghost like you see in my pictures. I tested this on my table with yarn, frogged twice, and this single-placement method works — my ghost stays single and centered with eyes 2 stitches apart.
If this feels too fussy, you can absolutely make my coasters as flat squares: chain 24, work 24 stitches wide in rows, place ghost chart centered in middle 12 stitches with 6 plain stitches on each side, then border with orange. You will still get my 4.5" size and my orange border and my ghost — just square not round, which is actually more standard for mosaic and easier for beginners. I have a square version on my blog too.
Full roadmap — 6 steps with my pictures
1. Mosaic technique — how I read X chart for beginners — with picture of my technique
2. Ghost coaster — white ghost on black — with picture of my ghost held in hand
3. Skull coaster — skull & crossbones — with picture of my skull on table
4. Orange border — burnt orange around each — 1 round
5. Fall styling — pumpkins & leaves on my table — with picture of my set
6. How my final coasters look — finished set hero — with picture of my stack
Step 1: Mosaic technique — how I do it for beginners
1How I read mosaic for my coasters — slow for beginners

This is the picture I wish I had when I learned mosaic — how I read a chart. Mosaic looks like colorwork but it is easier — you work one color per round, you never change color inside a round.
I start with magic ring, 6 sc in black, pull tight. Round 1-2 black plain. Then we start chart — my chart is 12 stitches wide for the single ghost, and I place it only once in the 36-stitch round — 12 plain, 12 chart, 12 plain — so I get one centered ghost, not three repeating. X's are where white ghost appears. When chart says X, I work dc in front loop of stitch 2 rows below — dc is needed because it is tall enough to reach — that pulls white yarn up and makes picture pop like mosaic tiles. When no X, I work normal sc in back loop in current color.
So round with black: I work black sc in BLO, but where chart has X, I work dc in front loop 2 rows below in white from previous round — dc's height lets it reach down two rows and stand proud — that creates white stitch on top of black. Next round white: same but opposite. I count X's out loud — my ghost has 2 eyes X's close together, skull has 2 big eye holes.
My tip from my table: I put stitch marker at start of round and I use a printed chart where I mark each round with pencil as I go. My first coaster I lost count and ghost had 3 eyes, I laughed and frogged 2 rounds and fixed it.
Start: MR black, 6 sc, increase to 12, 18, 24 — flat circle base 3 rounds
Then follow chart: Each round one color — black round: sc BLO in black where no X, dc in front loop 2 rows below in white where X — dc is the stitch that makes the picture pop because it reaches down — creates white picture on black
White round: opposite — sc BLO white where no X, dc in front loop 2 rows below in black where X — dc height is what makes mosaic work
Chart key: X = work dc in front loop 2 rows below with other color — dc height makes mosaic picture pop
Continue 8 rounds following ghost or skull chart — picture appears like magic — like Picture 1 technique close-up.
Step 2: My ghost coaster — white ghost on black
2My little ghost — how I make him pop

My ghost is my favorite — little white sheet ghost with 2 black eyes and mouth, like a friendly ghost, not scary. I made him on black background so white pops like in my picture 2 — hand holding ghost coaster, you can see thick yarn texture and orange border.
Follow ghost chart: Center has ghost shape — white body about 6 stitches wide, 7 tall, with wavy bottom like sheet, 2 black eyes near top. Chart has X's for white ghost on black background. I work 8 rounds — ghost appears round by round, so exciting, like magic.
After 8 rounds ghost done, I do orange border — 1 round sc around in burnt orange, 3 sc in corners if square, but mine is round so I do (sc, ch1) around to create orange edge like in my photos. Fasten off, weave tails inside with tapestry needle — I weave black tails through black, white through white, orange through orange so they do not show.
Base: MR black, 6 sc, inc to 12, 18, 24, 30, 36 — 5 rounds flat circle 3" — black
Rounds 6-13: Follow ghost chart with single placement — 8 rounds mosaic — 12 plain + 12 chart + 12 plain = 36 — white ghost appears once centered on black — X = white dc in front loop 2 rows below — ghost 6x7 stitches, eyes 2 sts apart — like Picture 2 — only one ghost, not 3 repeats
Border: Join orange, sc around entire edge, (sc, ch1, sc) in 4 even points for round shape, sl st close, FO weave.
Finished 4.5" with orange border — like Picture 2 ghost held in hand.
Step 3: My skull coaster — skull & crossbones
3My skull — a little spooky but still cozy

My skull coaster is a little more detailed but still beginner friendly — white skull with black eye holes and crossbones underneath, like pirate flag but cute. Picture 3 shows mine on my table with my pumpkins and leaves around — orange border pops against black and white.
Follow skull chart — similar to ghost but skull shape is more square top, with eye holes 2 big black squares, nose small, teeth little line. Crossbones are 2 white lines crossing under skull. I count carefully — skull is 8 stitches wide, 9 tall including crossbones. Work same mosaic method — one color per round, X's for white picture.
My tip: Skull needs even tension more than ghost because eye holes are bigger black spaces — if tension loose, holes look wobbly. I keep tension even and I block my skull coaster after — pin to 4.5" circle, spray water, let dry, eyes become crisp.
Base: Same as ghost — MR black 6 sc to 36 — 5 rounds — black
Rounds 6-14: Follow skull chart with single placement — 9 rounds mosaic — 12 plain + 12 chart + 12 plain = 36 — skull appears once centered — X = white dc in front loop 2 rows below — skull 8x6, crossbones 2 lines crossing — like Picture 3 — single skull, not 3 repeats
Border: Orange sc around, FO weave.
Finished 4.5" — skull crisp white on black with orange border.
Step 4: Orange border — how I finish each coaster
After ghost or skull mosaic done, I add burnt orange border — 1 round, so easy, makes it pop like in my photos. Join orange yarn in any stitch, ch1, sc around entire edge, working (sc, ch1, sc) in 4 evenly spaced points to keep circle round, not curling. If coaster curls, add more ch1 spaces. I do 36 sc around for 4.5" coaster.
Slip stitch to first sc, fasten off, weave orange tail through orange border, not through black or white. My border is about 0.25" wide — just enough orange to frame ghost and skull like picture.
Join orange in any st, ch1, sc around, (sc, ch1, sc) in 4 points evenly to keep round, 36 sc total, sl st close, FO weave through orange.
Border 0.25" — frames picture — like my photos with orange edge.
Step 5: My fall styling — pumpkins & leaves on my table
5How I style my coasters for fall — my table

I style my 4 coasters on my kitchen table — cream linen throw down, my favorite, then I scatter my mini orange pumpkins — two orange left, one white right like in my picture — maple leaves orange and brown from my backyard, eucalyptus sprigs, pine cones, acorns — around coasters, not too many, just cozy fall.
I hold my ghost coaster in my hand like in my final picture — my hand, nails natural, no polish, just cozy — to show size and orange border and ghost texture. Natural daylight 11am near my window, soft shadows, shows mosaic stitches and thick texture.
I use my coasters every day for my tea mugs — they protect my table and they make me smile. For gifts, I stack 4 coasters, tie with twine and add little tag I write "handmade with love by Sara" and a small dried eucalyptus sprig — my friends love them for Halloween.
Step 6: How my final coasters look — my finished set
6How my finished set looks in real life — from my table

This is how my finished coasters look in real life on my kitchen table — I wanted you to see front, back, stack and thickness before you start, so you know what you are making. Front is mosaic picture — white ghost or skull on black with burnt orange border — 4.5" diameter. Back is plain black with orange edge — neat and tidy, no knots showing because I wove tails through matching colors.
When I stack them, 4 coasters stacked are about 1" tall — each about 0.25" thick — sturdy and thick, not floppy. My ghost coaster is my favorite — white ghost with black eyes pops against black and orange border. Skull is a little spookier but still cozy with crossbones.
For size, I hold ghost coaster next to my hand — it covers most of my palm, perfect for mug. Not too big for table, not too small for my big tea mug. I have been using mine every day since October started and they still look new after washing — I wash cold and lay flat to dry.
How I finish mine — my little tricks from my table
I weave all tails inside with tapestry needle — I push needle through matching color a few times before cutting so tail does not pop out later when I wash. I weave black through black, white through white, orange through orange — so no white tail shows on black background.
I block my coasters after — I pin each to 4.5" circle on my blocking mat, spray water, let dry overnight — makes them flat and same size, ghost eyes crisp, not wobbly. My first coasters I did not block and they curled a little, now I always block and they stay flat even after washing.
My kitchen table moment for beginners: I made my set last weekend with cinnamon tea and rain on my window, my cat sitting on my chair watching my orange yarn ball roll. It took me an afternoon — 35 min per coaster x4 = 2 hours with breaks, plus 15 min for weaving and blocking. I put on my fall playlist — my cozy acoustic — so relaxing to watch ghost appear stitch by stitch, you will love it. If you get stuck on reading X chart, send me a message on my blog, I answer every message and I can send you a little chart I drew by hand.
Common beginner mistakes & how I fix them — from my blog
- Picture off-center / ghost lopsided: Did not count from center — start chart in center of circle, count X's outward. My ghost should be centered, eyes 2 apart.
- Mosaic holes / gaps: Tension uneven — front loop dc too loose — keep even tension, especially on dc in front loop 2 rows below. Pull up loop same height as sc.
- Coaster curls / not flat: Not enough increases in base circle — need 6 increases per round for flat circle. Also block to 4.5" after.
- White tail shows on black background: Weave tails through matching color only — white through white, black through black — I learned this after my first coaster had white speckles on black.
- Orange border wavy / ruffled: Too many stitches in border — do 36 sc around, not 40. If wavy, frog and do 32 sc.
- Picture blurry / X's not clear: Used fuzzy yarn — use smooth cotton like Lily Sugar'n Cream, not fuzzy acrylic — smooth shows mosaic crisp.
Ways to make it your own — from my blog
- Color swap: Try black with mustard yellow ghost for vintage Halloween, or navy with white ghost for winter — I have navy version on my blog too.
- Different pictures: Make pumpkin mosaic, cat mosaic, spider mosaic — same technique, different chart — I have pumpkin chart on my blog, so cute for fall.
- Bigger set: Make 6 coasters — 2 ghosts, 2 skulls, 2 pumpkins — for bigger family table — about 3 hours, my family uses 6 for Thanksgiving.
- No border: Coaster without orange border is still pretty — just black and white — faster, about 25 min — my sister likes minimal version.
- Add backing: Sew felt backing inside — I cut felt 4" circle, sew with blanket stitch — makes it extra thick and protects table more — optional but cozy.
- Placemat version: Make giant coaster 12" for placemat — continue increasing base to 72 stitches, then mosaic chart bigger — about 2 hours per placemat, my neighbor has set for Halloween dinner.
Thanks for making with me — from my table
I hope you love making my mosaic coasters as much as I loved making mine — they have been sitting on my coffee table all October and I keep picking them up to look at the little ghost. They are so cozy and my friends always ask how I made them.
If you make a set, I would love to see your fall styling — tag me on my blog or Instagram @sara.rain.crochet, I keep all your coaster photos in a little folder on my phone and I look at them when I need cozy inspiration for my next design.
Happy crocheting, friend!
