Inside my Beginner guide
- Before you begin — my story from my kitchen table
- Materials I used — from my yarn basket
- Sizing — how big my pouch is
- Abbreviations — I explain like we are together
- Full roadmap — 5 steps with my pictures
- Step 1: Granny square base — cream petals on sage (with picture)
- Step 2: 3D layered flower — puffy center flower (with picture)
- Step 3: Joining squares into pouch — my assembly
- Step 4: Flap & wooden button — closure
- Step 5: My fall styling — pumpkins & leaves
- Step 6: How my final pouch looks — finished product (with picture)
- How I finish mine — my little tricks
- Common beginner mistakes & how I fix them
- Ways to make it your own — from my blog
Before you begin — from my kitchen table
Hi friend, it is Sara here, with my tea going cold because I am too busy squishing this pouch. I have been wanting a fall granny square pouch for a while — not a big bag, but a little clutch that fits my phone, lip balm and keys, with 3D flowers that pop out and a wooden button that clicks shut.
I have been seeing sage green everywhere this fall — my sweaters, my mugs, my yarn basket — and I thought, I need a pouch in that color with cream petals like little daisies. So I grabbed chunky cotton in sage green and cream from my basket — 100% cotton, 80m balls, so soft and thick, makes it work up fast even for beginners.
What I love, especially for you if you are just starting, is granny squares are so forgiving. No magic ring stress really, just chains and double crochets. The 3D flower is puff stitches — I will walk you through puff stitch slowly, I promise. I made my first square while my bread was rising, about 20 minutes, then made 5 more while watching the rain. The whole pouch took me an afternoon, about 2 hours, with breaks for tea.
If you can chain and double crochet, you can absolutely make this. I keep tension a little loose with chunky yarn — chunky needs air to stay soft — and I count my clusters out loud. My first granny square was wonky and I still used it on the back side, it is cozy that way.
Materials I used — from my yarn basket
- Sage green: Chunky (bulky) 100% cotton — I used 80m balls in sage green, about 3 balls — the soft gray-green you see in my pouch, like eucalyptus.
- Cream: Same chunky cotton — about 2 balls — soft off-white like my kitchen linen, not stark white, for petals.
- 4.5mm crochet hook: My favorite wooden handle — keeps chunky yarn moving smooth, not too tight.
- Wooden button: One big wooden button, about 1" — natural brown with 2 holes — I found mine at my local craft store, looks like in my photos.
- Tapestry needle — big eye for chunky — scissors, stitch markers.
- My fall props: My mini orange and white pumpkins from the market, maple leaves from my backyard, pine cones, eucalyptus sprigs, cinnamon sticks, cream knit throw — I style mine on my table like I love.
Sizing — my pouch
My pouch finished is 8" wide, 4" tall, flap 3" extra — fits my phone, keys, lip balm and a little hand cream. Each granny square is 4" after blocking — 6 squares total make pouch. With 4.5mm hook and chunky, gauge is loose and cozy, about 3 clusters = 4". Don't worry about gauge for this, just make squares same size.
Chunky cotton is best — holds shape, thick texture you see in my photos, puffy flowers pop out. If you use worsted, your pouch will be smaller — about 6" wide — and thinner, not as squishy, and take longer.
Abbreviations — I explain like we are at my table
ch = chain — yarn over pull through, our base. sl st = slip stitch — insert, yarn over pull through both loops, for joining. sc = single crochet — insert, yarn over pull through, yarn over pull through two. dc = double crochet — yarn over, insert, yarn over pull through, yarn over pull through two, yarn over pull through two — taller stitch for granny. puff stitch = yarn over, pull up loop 3 times in same stitch, yarn over pull through all loops — makes puffy petal for 3D flower, I will show you slowly in pictures. MR = magic ring — little adjustable loop, or chain 4 and sl st to make ring if MR is tricky. FO = fasten off.
Full roadmap — 5 steps with my pictures
1. Granny squares — 6 squares, sage center with cream petals — with picture of my square
2. 3D layered flower — puffy sage flower for front — with picture of my flower tutorial
3. Join squares into pouch — whip stitch sides — with picture of assembly
4. Flap & wooden button — closure with button loop
5. My fall styling — pumpkins & leaves on my table — with picture of my final pouch
Step 1: Granny square base — my sage & cream squares
1My squares — how I make them, slow for beginners

Take sage green and 4.5mm hook. Make magic ring, or chain 4 and slip stitch to form ring if magic ring feels fussy in the morning — I do chain 4 method sometimes too when my hands are cold.
Round 1: Chain 3 (counts as dc), 2 dc into ring, ch2, *3 dc into ring, ch2* repeat 3 times — 4 clusters of 3 dc, 4 ch2 corners. Slip stitch to top of ch3 to close. You have little square with holes at corners, like in my picture 1 center sage part.
Round 2: Slip stitch to ch2 corner, ch3, 2 dc, ch2, 3 dc in same corner — first corner made. *Ch1, (3 dc, ch2, 3 dc) in next corner* repeat around, ch1, slip stitch to close. Now square bigger, sage green.
Round 3: Switch to cream for petals — join cream yarn in any corner, ch3, 2 dc, ch2, 3 dc in corner, ch1, 3 dc in next ch1 space, ch1, (3 dc, ch2, 3 dc) in next corner — continue around like picture 1 shows cream outer round with big puffy stitches. That cream round is what makes flower look in granny square.
Make 6 squares total — I made 4 in sage+cream like picture, and 2 with more cream for flap variation. My squares are 4" after I block them — I pin them to 4" on my blocking mat and spray water, let dry.
R1 — Sage: MR, ch3, 2 dc, ch2, [3 dc, ch2] x3 in ring, sl st to top ch3 (4 clusters)
R2 — Sage: sl st to corner, ch3, 2 dc, ch2, 3 dc in corner, ch1, [(3 dc, ch2, 3 dc) in next corner, ch1] x3, sl st close
R3 — Cream: Join cream in corner, ch3, 2 dc, ch2, 3 dc in corner, ch1, 3 dc in ch1 space, ch1, [(3 dc, ch2, 3 dc) corner, ch1, 3 dc, ch1] around, sl st, FO leave tail.
Make 6 — 4" each — block to 4" — like Picture 1.
Step 2: 3D layered flower — my puffy center flower
2My 3D flower — the heart of my pouch

This is my favorite part — the 3D flower that sits on front of pouch like in my final photo. It is puff stitches layered — looks hard but it is just repeating same stitch behind previous layer. Picture 2 shows my step-by-step I took at my table.
Start with magic ring, 6 sc into ring, pull tight, sl st close — small circle, flower center. Do not fasten off. This is core like picture 2 step 1 — hand holding ring with hook.
First layer puffy petals — like picture 2 step 2: Ch5, *puff stitch in next st, ch5, sl st in next st* repeat 5 times around — 5 puffy petals pointing outward, puffy like little clouds. Puff stitch: yarn over, insert hook, pull up loop, yarn over pull up loop again 3 times total in same stitch — 7 loops on hook — yarn over pull through all loops. Makes puffy bump. I do not stuff these chain-loop petals — the puff stitch itself gives all the puffy dimension. Just shape them with my fingers.
Second layer for 3D effect — like picture 2 step 3: Join yarn behind first layer, ch6, puff stitch, ch6, sl st, repeat 6 times offset between first petals — second layer behind first, slightly bigger, makes depth. No stuffing needed here — just shape the second layer with my fingers behind the first, it pops out on its own.
Final layer — larger outer petals — join behind layer 2, ch7, puff stitch, ch7, sl st repeat 7 times for larger petals. Fasten off, weave tail, lightly shape each petal with my fingers for 3D puff like in finished picture — no fiberfill needed for open chain loops in middle of tutorial image — fluffy, textured, perfect for my pouch front.
Center: MR, 6 sc into ring, pull tight, sl st close — core
Layer 1: Ch5, *puff st in next st, ch5, sl st* repeat 5x — 5 puffy petals outward, no stuffing needed — puff stitch gives dimension
Layer 2: Join behind layer 1, *Ch6, puff st, ch6, sl st* repeat 6x offset between petals — shape with fingers behind first layer, no fiberfill — puff provides dimension
Layer 3: Join behind layer 2, *Ch7, puff st, ch7, sl st* repeat 7x outer — larger petals, FO, weave, shape petals with fingers for 3D — no fiberfill in chain loops, puff stitch is puffy enough.
Finished ~7cm diameter — like Picture 2 bottom — fluffy for my pouch.
Step 3: Joining squares into my pouch — assembly
3How I join my squares into pouch

Lay out my 6 squares — I put 2 best ones for front, 2 for back, 2 slightly different for flap. My layout: front = 2 squares side by side stitched together, back = 2 squares, flap = 2 squares.
Whip stitch front 2 squares together — hold 2 squares right sides together, use cream tail and tapestry needle, sew through both loops along edge, 4" seam. Repeat for back 2 squares, and flap 2 squares. Now you have 3 panels: front, back, flap.
Now sew front to back — hold front and back right sides together, whip stitch along 3 sides: left, bottom, right — leave top open. Like little pocket. Turn right side out — now pouch shape. I do this with cream yarn so seam blends.
Sew flap to back top edge — flap panel sewn along back top edge, so it folds over front like envelope — like in picture 3 and final picture. My flap is 2 squares wide, folds over 3" onto front.
Sew my 3D flower onto front center — I sew flower onto front panel center with sage tail, whip stitch around base, a few stitches so it stays puffy and does not flatten. Like in my final photo — flower in middle of front, so pretty.
Step 4: Flap & wooden button — my closure
My flap needs button — I use big wooden button 1" natural brown like in my pictures. Sew button onto front of pouch — center front, about 1" below flap edge when folded — use cream yarn, sew through 2 holes twice, knot inside.
Button loop — on flap edge, make chain loop to go around button — I crochet: join cream in center of flap edge, chain 8, sl st back to flap edge to make loop — try loop around button, should fit snug not loose. If too tight, chain 10. My loop is chain 8 for 1" button.
Now flap folds over and loop goes around button to close — clicks shut, so satisfying. I love wooden button against sage green, so fall and cozy.
Join cream at center flap edge, ch8 (or ch10 for bigger button), sl st back to flap edge to make loop, FO weave.
Test around button — should close snug like envelope.
Step 5: My fall styling — pumpkins & leaves on my table
5How I style my pouch for fall — my table

I style my pouch on my kitchen table — I put cream knit throw down, my favorite linen, then I scatter my mini orange pumpkins I got from the market — two orange left side, one white right side like in my picture — maple leaves orange and brown from my backyard, pine cones, eucalyptus sprigs, cinnamon sticks — all around my pouch, not too many, just cozy fall.
I hold my pouch in my hand from below like in my final picture — my hand, nails natural, no polish, just cozy — to show size and wooden button and 3D flower texture. Natural daylight 11am near my window, soft shadows, shows chunky texture and puffy flowers.
I use my pouch for my phone and little things when I go to the market — it goes with my sage sweater. For gifts, I put in kraft box with dried eucalyptus and little tag I write "handmade with love by Sara" — my friends love it for fall birthdays.
How my final pouch looks — my finished product
6How my finished pouch looks in real life — from my table

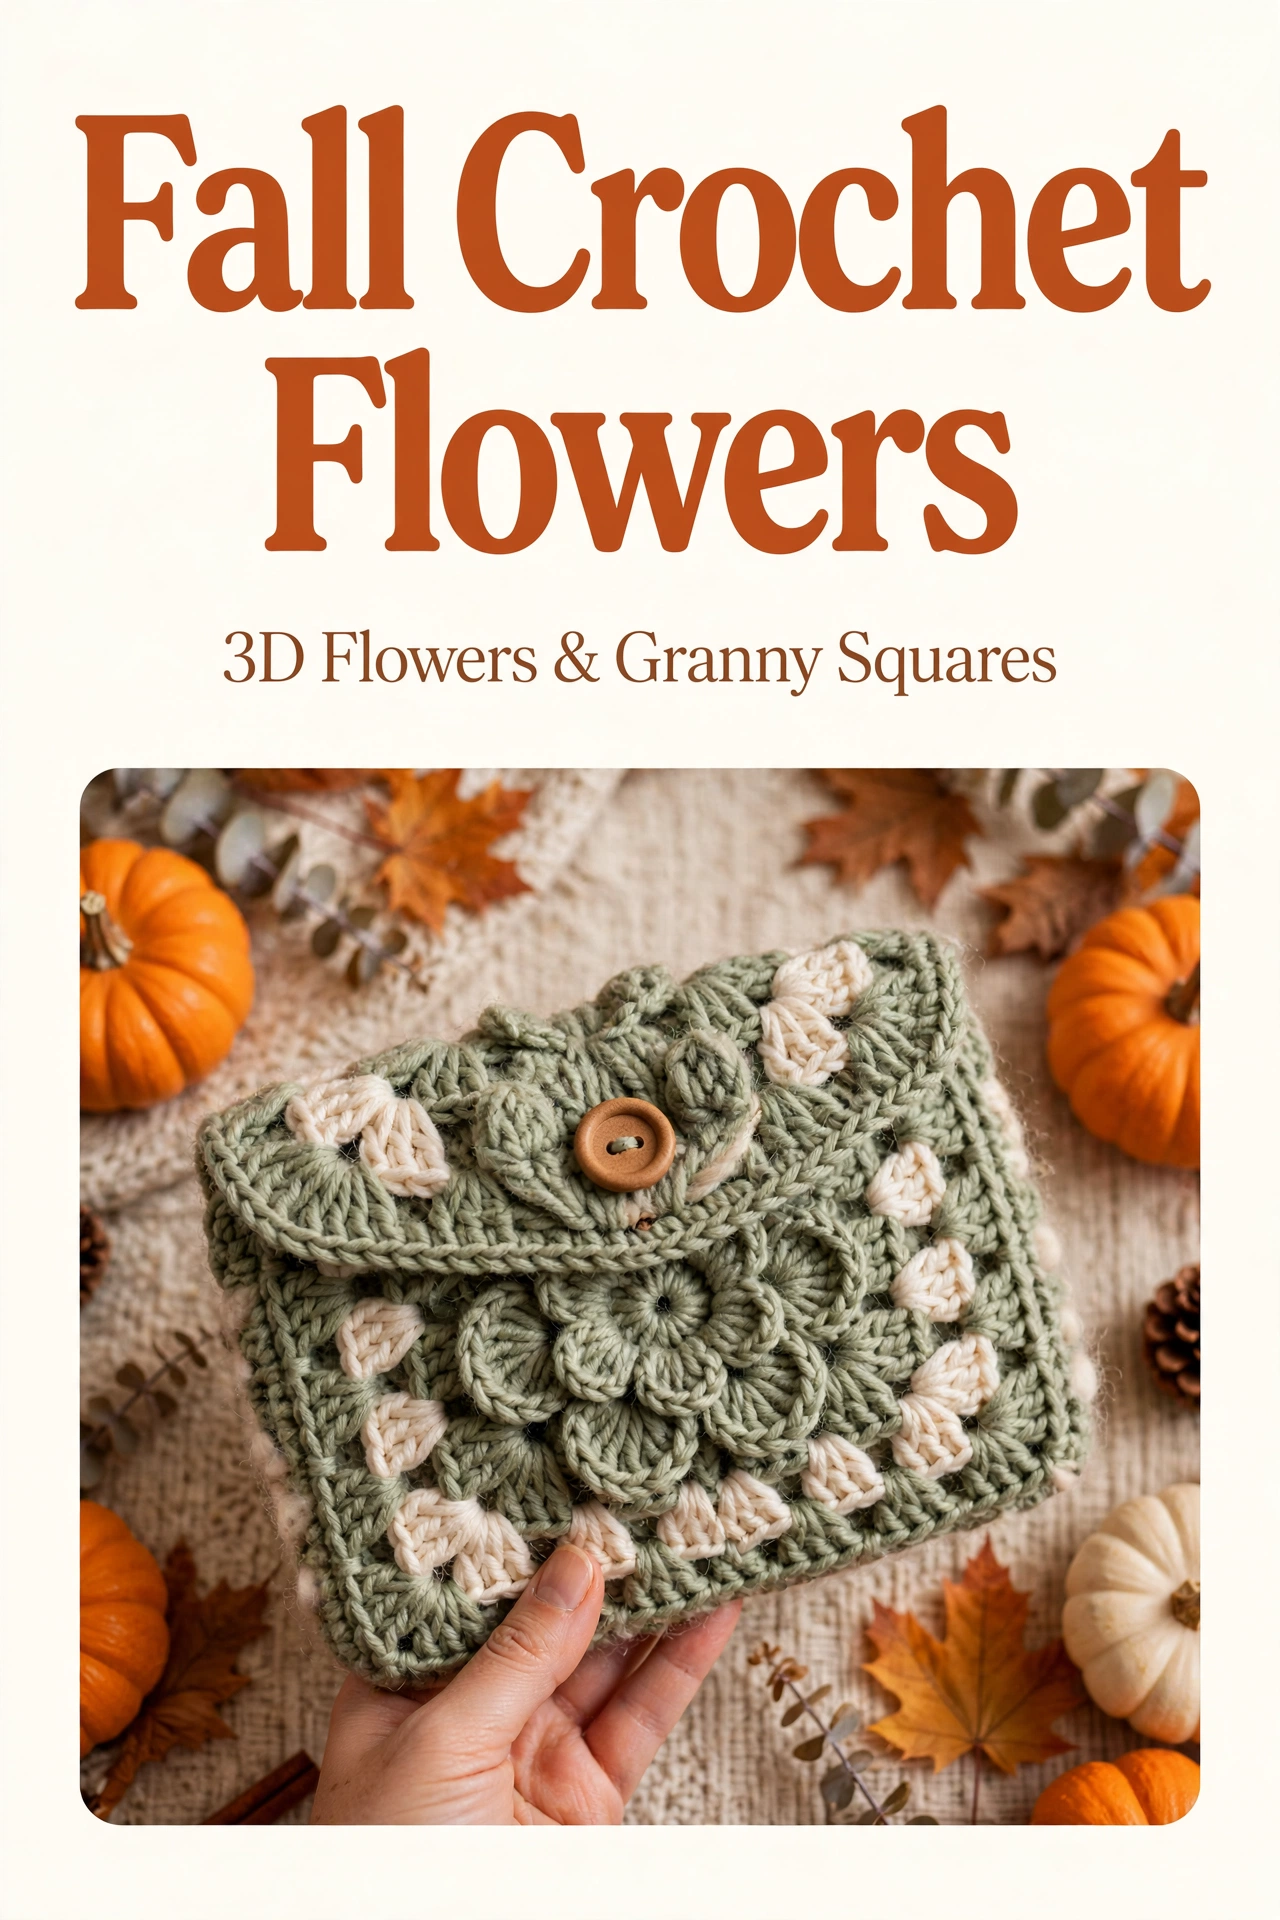
This is how my finished pouch looks in real life on my kitchen table — I wanted you to see front, back and inside before you start, so you know what you are making. Front is 2 sage and cream granny squares side by side with my 3D puffy flower sewn in center — 8" wide, 4" tall. Back is 2 granny squares without flower — plain and pretty. Flap is 2 squares that fold over front about 2" and my wooden button holds it shut with my chain-8 loop.
When I open it, inside is just my granny squares — you can see the holes of the granny stitch — I sometimes line mine with cream fabric I sew in, but even without lining it holds my phone and keys. The puffy 3D flower sticks out about 1" from front — so squishy, I love running my fingers over it. My wooden button is 1" natural brown, sewn 1" below flap edge on front.
For size, I hold it next to my hand — it covers my palm plus a little more, perfect clutch size. Not too big for market, not too small for phone. I have been using mine every day with my sage sweater and it goes with everything.
How I finish mine — my little tricks from my table
I weave all chunky tails inside with big tapestry needle — I push needle through squares a few times before cutting so tail does not pop out later when I use pouch. I steam lightly with my iron 3 inches away — not touching cotton, just hover steam — makes squares bloom and puffy flowers extra fluffy like in my photos.
I block my squares before joining — I pin each 4" square to 4" on my blocking mat, spray water, let dry overnight — makes them flat and same size, easier to join. My first pouch I did not block and squares were wonky, now I always block.
My kitchen table moment for beginners: I made my pouch last weekend with cinnamon tea and rain on my window, my cat sitting on my chair watching my sage yarn ball roll. It took me an afternoon — 20 min per granny square x6 = 2 hours with breaks, plus 30 min for 3D flower and assembly. I put on my fall playlist — my cozy acoustic — so relaxing to make granny squares, you will love it. If you get stuck on puff stitch, send me a message on my blog, I answer every message and I can send you a little video of my hands making puff.
Common beginner mistakes & how I fix them — from my blog
- Granny square curls / not flat: Corners too tight — ch2 corners need to be loose, I chain 2 loosely, not tight. Also steam and block to 4".
- Puff stitch flat not puffy: Loops too short and tight — pull up tall loops, 3 times, yarn over loosely. Use 6mm hook for flower for extra puff, like I do.
- Squares different sizes: Count clusters — each side should have same number. My squares have 3 clusters per side on round 3. Block to same size.
- Pouch stretches when using: Cotton stretches if not lined — I line mine with cream fabric I sew inside — optional but keeps shape. Or use tighter tension.
- Button loop too tight / too loose: Chain 8 for 1" button, test around button before fastening. My first loop was too tight, I frogged and chained 10.
- 3D flower flattens when sewn: Sew only base of flower, not petals, and stuff petals lightly as you sew so they stay puffy.
Ways to make it your own — from my blog
- Color swap: Try cream with sage petals for reverse — cream base with sage flowers — or mustard yellow and cream for vintage fall — I have mustard version on my blog too.
- Different button: Use brown leather button or coconut button for boho — I love wooden but leather is pretty too for fall.
- Bigger pouch: Make 9 squares — 3 front, 3 back, 3 flap — for bigger tote that fits book — about 12" wide, my friend uses as project bag.
- No 3D flower: Pouch without 3D flower is still pretty — just granny squares with button — faster, about 1.5 hours — my sister likes simple version.
- Add lining: Sew cream fabric lining inside — I cut fabric 8.5" x 6.5", sew sides, slip inside, whip stitch top — keeps things from poking through holes.
- Keychain version: Make 1 granny square, fold in half, add key ring — mini pouch for coins — so cute for market, I sell mini version for $12.
Thanks for making with me — from my table
I hope you love making my sage pouch as much as I loved making mine — it has been sitting on my kitchen table all week and I keep picking it up to squish the 3D flowers. It is so cozy and goes with every fall sweater I own.
If you make one, I would love to see your fall styling — tag me on my blog or Instagram @sara.rain.crochet, I keep all your pouch photos in a little folder on my phone and I look at them when I need cozy inspiration for my next design.
Happy crocheting, friend!
