Inside my Beginner guide
- Before you begin — my story from my kitchen table
- Materials I used — from my yarn basket
- Sizing — how big my charms are
- Abbreviations — I explain like we are together
- Full roadmap — 6 steps with my pictures
- Step 1: My ghost charm — chunky white 2 inch (with picture)
- Step 2: My bat charm — black with orange wings (with picture)
- Step 3: My pumpkin & mushroom charms (with picture)
- Step 4: My latte mug charm — whipped cream (with picture)
- Step 5: Wooden beads chain — how I assemble
- Step 6: How my final set looks — my finished charms (with picture)
- How I finish mine — my little tricks
- Common beginner mistakes & how I fix them
- Ways to make it your own — from my blog
Before you begin — from my kitchen table
Hi friend, it is Sara here, with my tea going cold because I am too busy squishing these tiny charms. I have been wanting bag charms for a while — little 2 inch chunky charms on wooden beads that I can clip to my tote bag or use as keychains, perfect for fall market season.
I have been seeing these on my feed — ghost, bat, pumpkin, mushroom and latte mug all on a wooden bead chain — and I thought, I need these for my bag. My tote bag is plain beige and needed something cozy and handmade. So I grabbed chunky yarn in white, black, orange, red and beige from my basket — 100% cotton, my favorite for charms because it holds shape and does not pill like acrylic.
What I love, especially for you if you are just starting, is each charm is just a tiny amigurumi — magic ring, single crochets, increase, decrease. No sewing big pieces, just tiny bodies. I made my ghost first while my bread was rising, about 20 minutes, then bat, pumpkin, mushroom and latte while watching rain. The whole set of 5 took me an afternoon, about 2 hours with tea breaks, plus 15 min for wooden beads chain.
If you can make a magic ring and single crochet, you can absolutely make these. I keep tension tight for charms — tight so stuffing does not show — and I count out loud. My first ghost had one eye bigger and I still use it on my keys, it is charming that way.
Materials I used — from my yarn basket
- White: Chunky — I used 5g white for ghost and mushroom stem, 10g for latte whipped cream — soft white like my kitchen linen.
- Black: Chunky — about 8g black for bat body and wings border — deep black like my cat.
- Orange: Chunky — about 6g orange for pumpkin and bat wings inside — warm orange like my mini pumpkins.
- Red & Beige: Red about 5g for mushroom cap with white dots, beige about 8g for latte mug body.
- 4.0mm crochet hook: My favorite Clover — keeps tight tension for charms so stuffing does not show.
- Wooden beads: 40 natural wooden beads 15mm — I need 20 for main loop + 5 strands x 4 beads each = 20, so 40 total, I fixed this from 25 which would leave me short, jute twine, 5 key rings or lobster clasps for charms.
- Tapestry needle, scissors, stitch markers, tiny bit polyfill.
- My fall props: My mini orange and white pumpkins, maple leaves, eucalyptus, pine cones, cream linen — I style mine on my table like I love for fall.
Sizing — my charms
My charms finished are 2 inches tall — 5cm — I measured with my ruler — perfect for bag charms and keychains, not too big to bang on table, not too small to lose in bag. Ghost is 2" tall with wavy bottom, bat 2" wide with wings, pumpkin 1.5" tall x 2" wide, mushroom 2" tall, latte mug 2" tall with handle. Wooden bead chain is 12" long loop with 5 strands 4" each hanging, like in my photos.
With 4mm hook and chunky, each charm takes 20 min. If you use worsted, your charm will be 1.5" smaller and take a little longer, but still cute.
Abbreviations — I explain like we are together
MR = magic ring — adjustable loop I start all my charms with, or ch2 and 6 sc in 2nd ch if MR feels fussy. sc = single crochet — my main stitch for charms, tight. inc = increase — 2 sc in same stitch. dec = decrease — I do invisible decrease — insert hook in front loop of next 2 stitches, yarn over pull through both front loops, yarn over pull through 2 loops — keeps it neat. sl st = slip stitch, ch = chain, FO = fasten off. I work in continuous rounds with stitch marker, no joining, so I count rounds.
Full roadmap — 6 steps with my pictures
1. Ghost charm — chunky white 2 inch — with picture of my ghost tutorial
2. Bat charm — black body with orange wings — with picture of my bat
3. Pumpkin & mushroom — orange pumpkin and red mushroom with white dots — with picture
4. Latte mug — beige mug with whipped cream and handle — with picture
5. Wooden beads chain — how I string beads and attach charms
6. How my final set looks — 5 charms on beads with pumpkins — with picture of my final set
Step 1: My ghost charm — chunky white 2 inch
1My little ghost — my favorite, quick and squishy

My ghost is my favorite charm — little white sheet ghost with 2 black eyes and tiny smile, like friendly ghost from my kitchen, not scary. I made him chunky with tight stitches so he holds shape on my bag.
Round 1: Magic ring, 6 sc into ring (6). Pull tight. Place marker. Round 2: inc around — 2 sc in each st (12). Round 3-5: sc around (12) for 3 rounds — makes little dome shape. Round 6: For wavy bottom like sheet, *sc, (sc, ch1, sc) in next st* repeat around — makes little points around bottom like ghost sheet fluttering. Fasten off leave long tail, stuff tiny pinch polyfill — just a little, not firm, so squishy.
Embroider eyes with black yarn — 2 small French knots or straight stitches between rounds 3-4, about 3 stitches apart like in my picture. Smile tiny with black — small curved line. Add loop on top — ch6 loop with white, sl st back to top for hanging on wooden bead chain.
R1: MR, 6 sc (6)
R2: inc around (12)
R3-5: sc around (12) — 3 rounds — dome shape
R6: *sc, (sc, ch1, sc) in next st* repeat 6x — wavy bottom (18 with ch1 spaces) — sheet flutter
FO leave tail, stuff tiny pinch polyfill lightly, embroider 2 black eyes between R3-4, 3 sts apart, small smile, add ch6 loop on top for hanging — like Picture 1.
Finished 2" tall — squishy ghost for bag.
Step 2: My bat charm — black with orange wings
2My little bat — spooky but cozy

My bat charm is a little more detailed but still beginner — black body with orange inside wings, like little Halloween bat but cute and chunky, not scary. Picture shows mine on my table.
Body: MR black 6 sc, inc to 12, sc 3 rounds (12), dec to 6, FO stuff tiny pinch. Ears: 2 tiny black triangles — MR 4 sc, sc around, flatten and sew on top. Wings: Make 2 — with orange, ch4, sc, hdc, dc, FO, then with black, sc around orange to create black border with orange inside like in my pin — bat wings with orange membrane. Sew wings to sides of body.
Add ch6 loop on top for hanging.
Body: MR black 6 sc, inc to 12, R3-5 sc around (12), R6 dec to 6, FO stuff tiny pinch
Ears x2: Black MR 4 sc, R2 sc around (4), flatten, sew on top
Wings x2: Orange ch4, R1 sc, hdc, dc in chs (3), FO, join black, sc around orange to make black border with orange center — wings
Sew wings to body sides, add ch6 loop top — like Picture 2
Finished 2" wide with wings — cute bat.
Step 3: My pumpkin & mushroom charms
3My fall charms — pumpkin and mushroom

My pumpkin charm is easiest — orange little pumpkin like my big chunky pumpkins but mini 1.5" for bag. My mushroom is red cap with white dots like toadstool, so cute with pumpkin.
Pumpkin: MR orange 6 sc, inc to 12, inc to 18, sc 2 rounds (18), dec to 12, dec to 6, FO stuff lightly, cinch top. Add green stem — green ch3, sc, FO sew on top. For ridges like my big pumpkins, I wrap orange yarn around outside 6 times from top to bottom through center and pull slightly to make lobes — same technique as my big pumpkin tutorial, just mini.
Mushroom: Cap — MR red 6 sc, inc to 12, inc to 18, sc 2 rounds (18), FO leave tail. White dots — embroider 3 white dots with white yarn French knots on cap. Stem — white MR 6 sc, sc 3 rounds (6), FO stuff tiny. Sew cap to stem.
R1: MR orange 6 sc (6)
R2: inc around (12)
R3: [sc, inc] x6 (18)
R4-5: sc around (18) — 2 rounds
R6: [sc, dec] x6 (12)
R7: dec around (6), FO stuff lightly, add green stem ch3, wrap 6x for ridges like big pumpkin
Finished 1.5" tall x 2" wide — mini pumpkin
My Mushroom Charm — Red + White — 4mm:
Cap: MR red 6 sc, inc to 12, inc to 18, R4-5 sc around (18), FO
Stem: White MR 6 sc, R2-4 sc around (6), FO stuff tiny, sew cap to stem, embroider 3 white dots on cap — like Picture 3
Finished 2" tall — toadstool.
Step 4: My latte mug charm — whipped cream
4My latte mug — cozy coffee charm

My latte mug charm is my cozy favorite — little beige mug with white whipped cream swirl on top like my morning latte, with tiny handle. Picture 4 shows mine on my table with cinnamon sticks and maple leaves — so fall.
Mug body: Beige MR 6 sc, inc to 12, inc to 18, sc 4 rounds (18) — makes little cup shape. Do not stuff. Whipped cream: White — MR 6 sc, inc to 12, sc around, then make little swirl by chaining and wrapping — I do: ch2, 2 dc in same st, 3 dc in next, etc to make ruffled top, sew on top of mug. Handle: Beige ch5, sl st back, sew to side of mug. Add gold lobster clasp with ch6 loop on top.
Mug: Beige MR 6 sc, inc to 12, inc to 18, R4-7 sc around (18) — 4 rounds cup shape, FO
Whipped cream: White MR 6 sc, inc to 12, R3 sc around, R4 ruffle — (2 dc in st, 3 dc in next) repeat for swirl, FO sew on top of mug
Handle: Beige ch5, sl st back, sew to side of mug
Add ch6 loop with clasp — like Picture 4
Finished 2" tall — cozy latte.
Step 5: Wooden beads chain — how I assemble my set
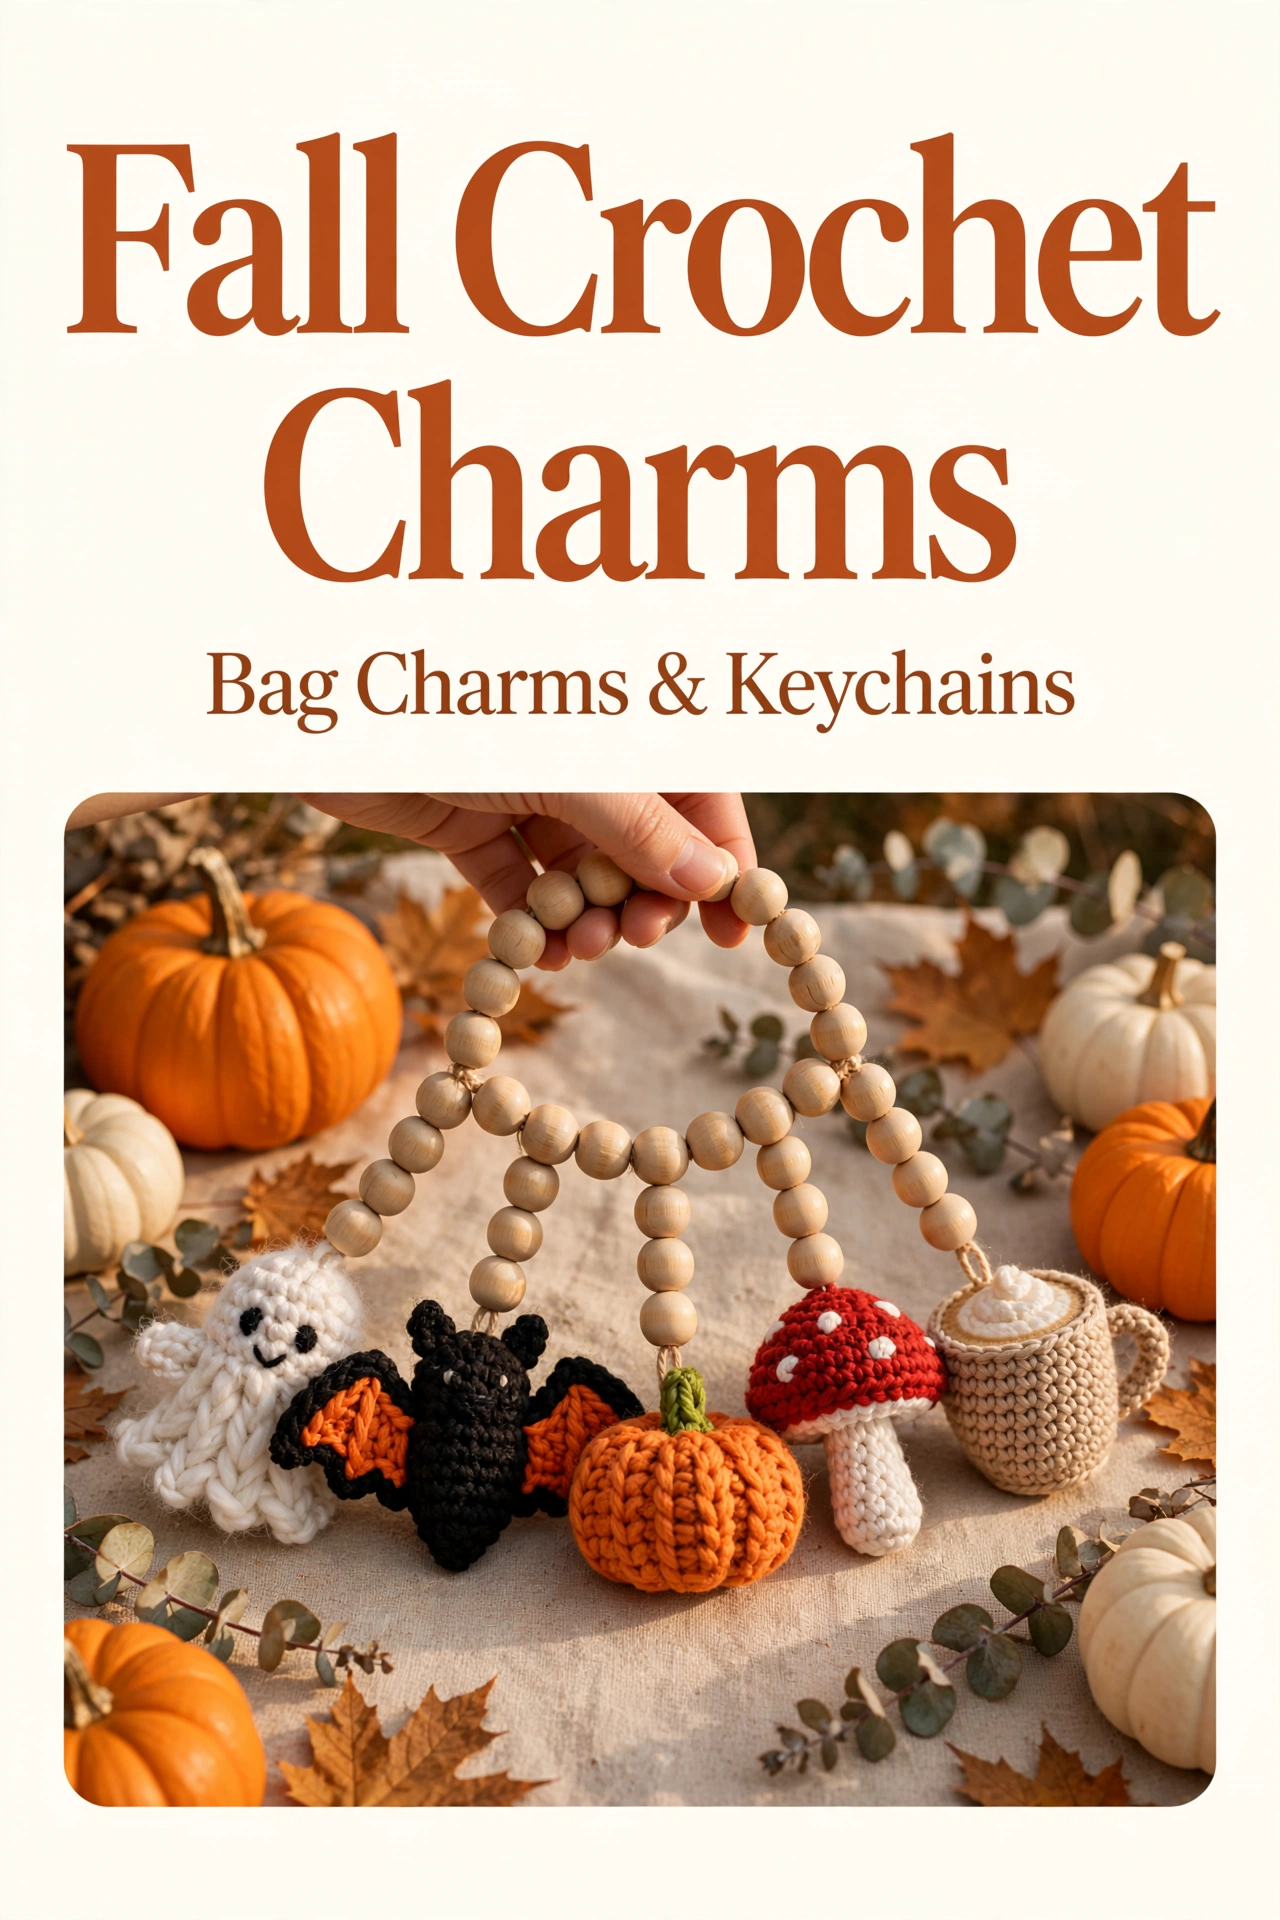
My wooden bead chain is what makes it a bag charm holder like in your photo — hand holding wooden bead loop with 5 strands hanging, each with a charm. So pretty and boho.
I take natural jute twine or cotton cord — about 30 inches — and string 20 wooden beads 15mm for main loop — loop about 8" diameter when held like in photo. Tie knot to make loop.
Then I make 5 hanging strands: Cut 5 pieces twine 8" each, string 3-4 wooden beads on each strand, tie charm to bottom of each strand with ch6 loop of charm — ghost, bat, pumpkin, mushroom, latte in order like in photo left to right. Attach each strand to main bead loop with knot, evenly spaced — 2 strands on each side and 1 in middle — like in photo with hand holding.
My main loop is what I hold or hang on bag — I clip my bag charm holder onto my tote bag handle with the main loop, or I use as keychain holder on my kitchen hook. So versatile.
Main loop: 30" jute, string 20 beads 15mm, tie to make 8" diameter loop
Hanging strands x5: 8" jute each, string 3-4 beads each, tie charm to bottom with charm loop, attach to main loop evenly spaced — ghost, bat, pumpkin, mushroom, latte left to right
Finished holder 12" long total — like in final photo hand holding.
Step 6: How my final set looks — my finished charms
6How my finished set looks in real life — from my table

This is how my finished charms look in real life on my kitchen table — I wanted you to see front, size and how they hang before you start, so you know what you are making. Each charm is 2 inches tall, 5 charms on wooden bead chain 12 inches long total when held like in photo.
Ghost is white with black eyes, wavy bottom, bat black with orange wings, pumpkin orange with green stem and 6 ridges, mushroom red cap with 3 white dots and white stem, latte beige mug with white whipped cream swirl and handle. All on natural wooden beads 15mm, jute twine, boho fall style.
For size, I hold my ghost charm next to my hand — it covers part of my palm, tiny and cute, perfect for bag charm not too big to bang. My wooden bead loop is about 8" diameter when held, strands 4" hanging, charms 2" each — total 12" long like in photo. I have been using mine on my tote bag every day since fall started and they still look new — I spot clean with damp cloth.
How I finish mine — my little tricks from my table
I weave all tails inside with tapestry needle — I push needle through matching color a few times before cutting so tail does not pop out later when charms swing on bag. I weave white through white, black through black, orange through orange.
I stuff each charm lightly — just a pinch polyfill, not firm — so they stay squishy and light for bag, not heavy. My first charms I stuffed too firm and they were heavy on my tote, now I stuff lightly and they bounce.
My kitchen table moment for beginners: I made my set last weekend with cinnamon tea and rain on my window, my cat sitting on my chair watching my orange yarn ball roll. It took me an afternoon — 20 min per charm x5 = 1 hour 40 min with breaks, plus 20 min for wooden beads chain. I put on my fall playlist — my cozy acoustic — so relaxing to make tiny ghosts, you will love it. If you get stuck on bat wings orange inside black border, send me a message on my blog, I answer every message and I can send you a little video of my hands making wings.
Common beginner mistakes & how I fix them — from my blog
- Charm too small / too tight, stuffing shows: Tension too tight or too loose — keep even tight tension, 4mm hook, chunky yarn. If stuffing shows, go down to 3.5mm hook.
- Ghost wavy bottom not wavy: Did not do (sc, ch1, sc) in same st — that creates points. Do ch1 between sc's to make flutter like sheet.
- Bat wings not orange inside black: Crochet orange center first, then black border around — orange ch4 base, then black sc around — makes orange membrane like bat.
- Pumpkin no ridges: Wrap orange yarn around outside 6 times from top to bottom through center and pull slightly — same as my big chunky pumpkins, makes lobes. Mini but same technique.
- Mushroom dots falling off: Embroider white dots with French knots, not glue — French knots stay, glue falls. 3 dots only, not too many.
- Wooden bead chain tangles: Tie knots tightly between beads and strands, use jute not slippery cord, and keep strands 4" not longer so they do not tangle like in photo.
Ways to make it your own — from my blog
- Color swap: Try cream ghost with pink cheeks, purple bat wings, cream pumpkin for boho — I have boho version on my blog too.
- Different charms: Make acorn, leaf, apple, coffee cup charms — same base 2 inch, different tops — I have apple chart on my blog, so cute for fall.
- Bigger set: Make 7 charms — add 2 more like candy corn and leaf — for bigger bag, about 3 hours, my sister uses 7 on her backpack.
- Keychain only: Make 1 charm with lobster clasp for keychain — ghost only for Halloween, pumpkin only for Thanksgiving — faster, 20 min — my friends love single charm gifts.
- No wooden beads: Charms without beads as ornaments — add twine loop and hang on fall tree — I have fall tree with charms as ornaments.
- Add scent: Put tiny cinnamon stick inside latte mug charm or lavender inside ghost for scented charms — my daughter loves scented, smells like fall.
Thanks for making with me — from my table
I hope you love making my little bag charms as much as I loved making mine — they have been hanging on my tote bag all week and I keep looking at them when I am at the market. They are so tiny and cozy and my friends always ask where I got them.
If you make a set, I would love to see your fall styling — tag me on my blog or Instagram @sara.rain.crochet, I keep all your charm photos in a little folder on my phone and I look at them when I need cozy inspiration for my next design.
Happy crocheting, friend!
