Before You Begin
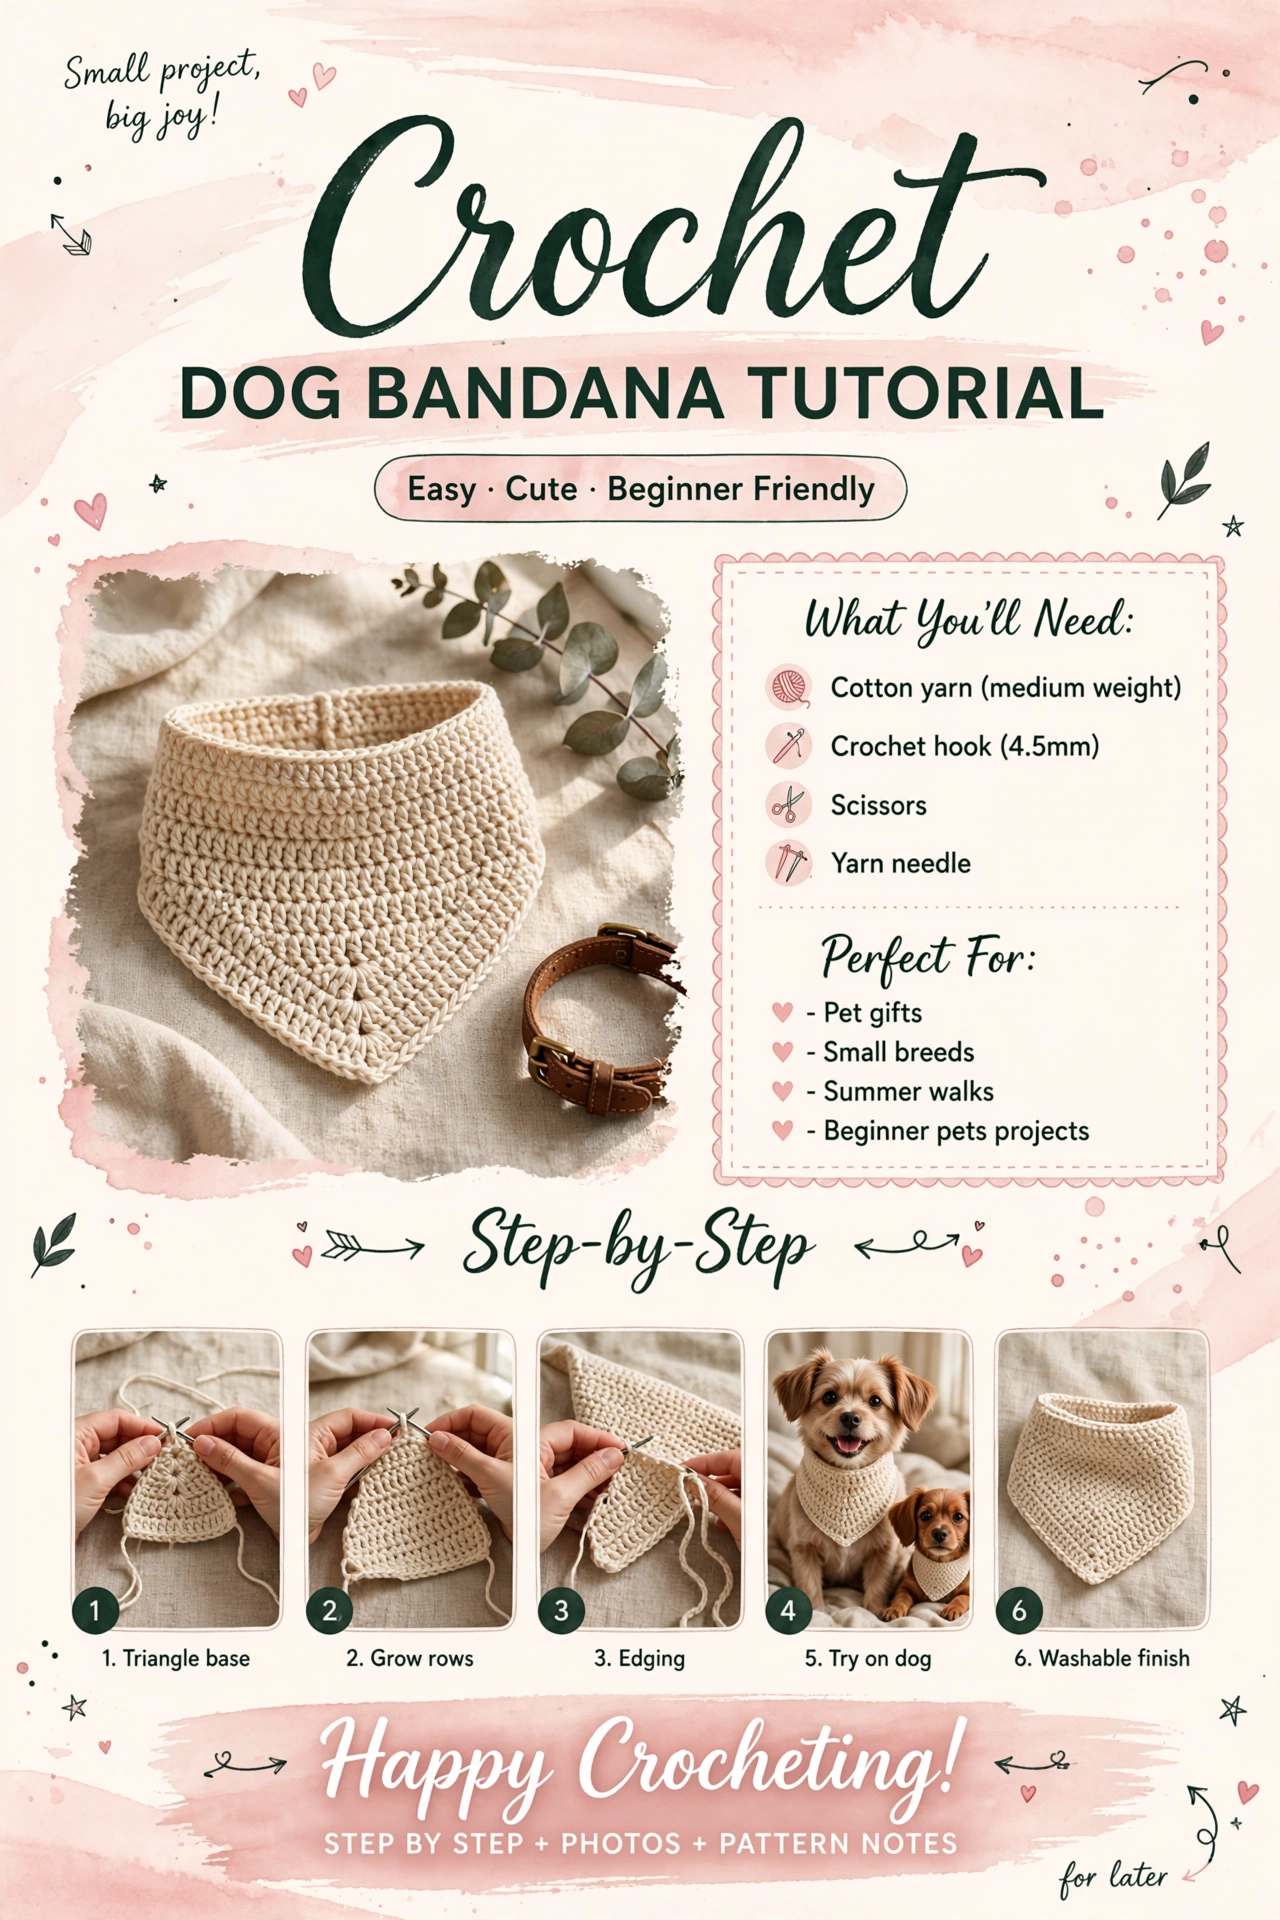
A crochet dog bandana is a lovely small project when you want to make something handmade without committing to a large blanket or garment. The basic shape is a triangle that grows gradually from a narrow point into a wider bandana.
The construction is intentionally simple. You work the main triangle row by row, increasing the width as you go. Once the triangle reaches the size you need, a clean border can be added around the outside. Finally, the top edge can be finished with ties so the bandana can be adjusted around your dog's neck.
Materials & Preparation
The sample shown in the Pin uses a medium-weight cotton yarn and a 4.5 mm crochet hook. Cotton is a practical choice because it creates a structured fabric and is easy to wash.
Optional supplies
- Stitch marker
- Tape measure
- Small amount of contrasting yarn for the border
Before starting, make sure your yarn is wound smoothly and your hook matches the yarn. If your stitches feel extremely loose, try a slightly smaller hook. If the fabric feels stiff and difficult to work into, try a slightly larger hook.
Sizing & Fit
The easiest way to size a dog bandana is to measure the area where you want the top edge to sit rather than relying only on a standard small, medium, or large label.
Take three simple measurements
- Measure around the dog's neck where the bandana will sit.
- Decide how far down you want the triangle to hang.
- Leave enough room for the ties or fastening method to adjust comfortably.
For a smaller dog, stop increasing earlier and create a shorter triangle. For a larger dog, continue adding rows until the bandana reaches the desired width and depth.
Complete Tutorial Roadmap
Step-by-Step Crochet Dog Bandana Pattern
This pattern builds a triangular shape from the point upward. The important idea is consistency: each row should grow evenly so the two sides remain balanced.
Step 1 — Make the starting chain
Begin with a short foundation chain. The first few stitches establish the narrow point of the bandana.
Keep the chain relaxed. Pulling the foundation chain too tightly can make the first rows difficult to work into and can cause the point to curl.
Starting point
Chain a small foundation.

Work the first row into the chain,
placing your stitches evenly.

Turn your work at the end of the row.
Step 2 — Begin growing the triangle
From this point onward, the bandana grows by adding stitches on the sides of each row. This creates the triangular silhouette shown in the Pin.
Work your chosen basic stitch across the row, then make the increase at the appropriate edge before turning.
Growth rows
Row 1:
Work across the foundation.

Row 2:
Turn, work across the row,
then increase at the outer edge.

Row 3:
Turn and repeat the established
stitch pattern, increasing again.

Continue repeating the growth pattern
until the bandana reaches the desired width.
The exact number of rows depends on the dog and the amount of coverage you want. Instead of forcing every dog into one fixed size, measure the piece as you crochet.
Step 3 — Keep the triangle symmetrical
Lay the bandana flat every few rows. The center point should remain centered and the two outer edges should grow evenly.
If one side begins to look longer than the other, stop and check whether an increase was missed or accidentally added twice.
Step 4 — Continue until your size is reached
Continue the same row sequence until the triangle provides the amount of coverage you want on the dog's chest.
For a small dog, the finished triangle may need only a modest number of rows. For a larger dog, continue for additional rows. The most useful measurement is the actual finished width and depth rather than the number of rows alone.
Step 5 — Prepare for the border
Once the main triangle is complete, fasten off if you are changing colors, or continue directly into the edging if you want a single color design.
Before beginning the border, gently stretch the triangle flat with your fingers. Do not pull aggressively; the goal is simply to reveal the natural shape of the fabric.
Progress Checkpoints
Checking your work as you go is much easier than discovering a problem after the entire bandana is finished.
Troubleshooting
Edging & Finishing
A simple border gives the bandana a more polished appearance and helps define the triangular shape.
Adding the border
Join your yarn near one of the upper corners and work evenly around the two angled sides and the bottom point of the triangle.
Use a simple single crochet border for a clean beginner-friendly finish. At the bottom point, work carefully into the corner so it remains sharp without becoming bulky.
Simple edging
Join yarn at an upper corner.

Single crochet evenly down
the first side.

Work into the bottom point,
placing enough stitches to turn
the corner neatly.

Continue single crochet
up the opposite side.

Finish at the opposite corner
and fasten off.
Creating the neck ties
The simplest fastening is a crocheted chain attached securely to each upper corner.
- Attach yarn securely to one upper corner.
- Crochet a chain long enough to create a comfortable adjustable tie.
- Fasten off and weave the end securely into the fabric.
- Repeat on the opposite corner.
- Check both ties for equal strength before putting the bandana on your dog.
Final shaping
If the cotton fabric needs a little help holding its shape, lightly dampen it and lay it flat. Smooth the triangle with your fingers and allow it to dry completely.
Avoid aggressive stretching. You want the bandana to retain its natural shape while looking neat and flat.
Variations & Custom Ideas
Once you understand the basic triangle construction, there are many ways to personalize the bandana.
Try different colors
- Soft cream and blush for a gentle look
- Classic black and white
- Natural beige and brown
- Pastel colors for spring
- Bright colors for summer walks
- Red and green for holiday photos
Add a contrasting border
A contrasting edging can make the triangle stand out. Crochet the main bandana in one neutral color and use a second shade for the border and ties.
Add a simple decorative detail
For an extra handmade touch, you can add a small crocheted flower, heart, initial, or other flat decoration. Keep decorations securely attached and avoid small loose pieces that could be chewed or swallowed.
Make a matching set
The same yarn colors can be used to create matching accessories for the owner, such as a small crochet keychain, flower, or scrunchie. This makes the bandana especially fun for photos and handmade gifts.
Care & Storage
Cotton crochet accessories are generally easy to maintain, but always follow the care instructions printed on your specific yarn label.
- Wash gently according to the yarn manufacturer's instructions.
- Reshape the triangle while damp if necessary.
- Allow the bandana to dry completely before storing it.
- Check the ties and edging regularly for wear.
- Replace the bandana if the yarn becomes damaged or excessively loose.
Store the bandana flat or loosely folded so the triangle keeps its shape. Keeping it clean and dry will also help the cotton remain fresh between uses.
Happy Crocheting! 🧶🐶
This crochet dog bandana is a simple project that lets you practice basic rows, increases, edging, and finishing while creating something your favorite pup can wear for special occasions, photos, or everyday walks.
Choose a yarn color you love, adjust the triangle to your dog's measurements, and make it completely your own.
← Back to Sara Rain Crochet